


Removal and replacement procedures 49
IMPORTANT: Heatsinks for processors 1 and 2 are not interchangeable with the heatsinks for
processors 3 and 4.
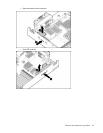
8.
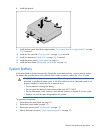
Install the heatsink.
IMPORTANT: Install all components with the same configuration that was used on the failed
system board.
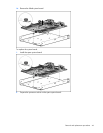
9.
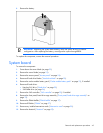
Install the BBWC battery holders.
10.
Install all components removed from the failed system board.
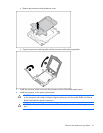
11.
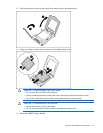
Install the front panel/hard drive cage assembly.
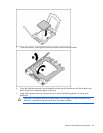
12.
Install all hard drives and hard drive blanks.
13.
Install the access panel ("Access panel" on page 24).
14.
Install the server blade ("Remove the server blade" on page 23).
After you replace the system board, you must re-enter the server serial number and the product ID.
1.
During the server startup sequence, press the F9 key to access RBSU.
2.
Select the System Options menu.
3.
Select Serial Number. The following warning is displayed:
WARNING! WARNING! WARNING! The serial number is loaded into the system
during the manufacturing process and should NOT be modified. This option
should only be used by qualified service personnel. This value should
always match the serial number sticker located on the chassis.
4.
Press the Enter key to clear the warning.
5.
Enter the serial number and press the Enter key.
6.
Select Product ID.
7.
Enter the product ID and press the Enter key.
8.
Press the Esc key to close the menu.
9.
Press the Esc key to exit RBSU.
10.
Press the F10 key to confirm exiting RBSU. The server will automatically reboot.