


HP Webcam HD 5210 User’s Guide 17
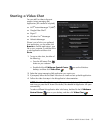
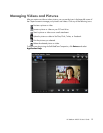
Adjusting Additional Webcam Settings
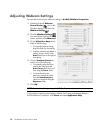
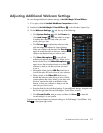
You can change additional webcam settings in ArcSoft Magic-i Visual Effects.
1 If it is open, close the ArcSoft WebCam Companion window.
2 Double-click ArcSoft Magic-i Visual Effects in the Windows System Tray.
3 On the Webcam Settings tab, do any of the following:
Click System Setting , click the Private tab,
click Load Image , and then select an image
to replace the webcam video when you want
privacy during a chat.
Click Private to replace the webcam video
with the image you selected in System Settings.
When you’re done with the chat, click Private
again to reveal the video so that your webcam is
ready to use the next time you want to use it.
Click Mute Microphone to turn off the
webcam microphone during a chat. When you’re
done with the chat, click Mute Microphone
again to turn the microphone back on so that your
webcam is ready to use the next time you want
to use it.
Remove the check from the LED On check box to
turn off the status LED on the front of your webcam.
Place a check in the Video Off check box to
disable the webcam video during a chat. A blank
screen replaces the video. When you’re done with
the chat, remove the check to enable the video
feature, so that your webcam is ready to use the
next time you want to use it.
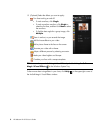
Drag the slider for the individual settings. To see additional settings, drag the scroll
bar on the right side of the ArcSoft Magic-i Visual Effects window.
Click Current Profile, enter a name, and then click Save to store the
current settings in a user profile.
To learn more about customizing webcam settings in ArcSoft Magic-i Visual Effects, click
Help in the upper-right corner.