


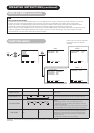

ENGLISH
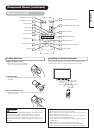
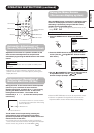
AUTO PinP SIZE
MUTE VOL
VOL
RECALL
RGB 1 RGB 2
ENTER
VIDEO 1 VIDEO 2
MENU RETURN
ID
ID SET
ID SET button
ID button
AUTO button
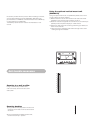
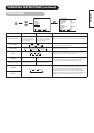
Using the Menu Screen
(On-screen display system)
When the MENU button is pressed, the adjustment menu
screen will be displayed; from there, video adjustment
and setting is possible by using the SELECT button,
ADJUST button and ENTER button.
• Refer to - concerning the adjustment items and the
settings.
Example: Selecting the Picture screen
1. Press the MENU button to display the Main Menu
screen.
2. Press the ENTER button to display the Picture Menu
screen. (Use the and SELECT buttons to select
other items.)
3. Use the and SELECT buttons to select the item to
be adjusted and then use the and ADJUST
buttons to adjust (example: COLOR).
• Press the RETURN button to return to the previous screen.
• If there is no operation for a period of one minute, the
Adjustment Menu screen will be closed automatically.
MENU
MAIN MENU
PICTURE
SOUND
DISPLAY
FUNCTION
OTHER
SEL. ENT ENT. RTN END
ENTER
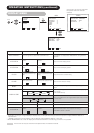
PICTURE MENU 1/2
OPERATE MODE : NORMAL
CONTRAST : 127
BRIGHTNESS : 0
COLOR : 0
TINT : 0
ENHANCER : LOW
FILTER : OFF
RESET
SEL. ENT ENT. RTN BACK
OPERATING INSTRUCTIONS (continued)
ADJ RTN BACK
COLOR 0
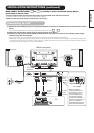
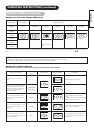
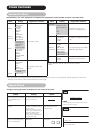
Independent Operation of
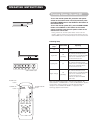
Multiple Monitors (ID No)
Setting the ID No. of the remote control allows separate
control of up to a maximum of seven monitors.
Remote control ID No. 2 (initially ID no. 1) can be set by
pressing the ID SET button for 2 sec. or more while
holding down the ID button. The number will be
incremented (2 6 7 1 2) when this button pressed
continuously.
The ID remote control is operated by pressing the
various buttons while holding down the ID button;
Operation is possible only when the remote control and
monitor ID nos. are the same.
• The remote control can be operated normally by pressing the
various remote control buttons without holding down the ID button.
• Set the monitor using the ID No. of OTHER MENU.
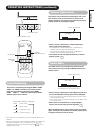
Automatic Adjustment of
Screen Position and the Clock
Adjustment of the screen to a position suitable for the
video and the clock adjustment can be performed
automatically by pressing the AUTO button of the remote
control.
* Depending on the signal, satisfactory adjustment may not be
possible in some cases. In such case, adjust by referring to the
Display Menu item.
SET. ID:1
R/C.
ID:1
Monitor ID no.
Remote control ID no.
The remote control ID no. can be checked
by pressing the ID SET button while holding
down the ID button.
Perform this adjustment for each input (RGB1 or RGB2) and for
each signal.
CAUTIONS
MENU button
ENTER button
SELECT/ADJUST
buttons