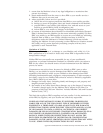
3.
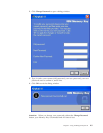
To
create
a
volume
label,
type
the
label
name
in
the
Volume
label
field
(up
to
11
characters).
4.
To
begin
creating
a
boot
disk,
click
Start.
A
warning
message
displays
informing
you
that
all
your
files
will
be
deleted.
To
continue,
click
OK.
To
cancel
the
formatting
process,
click
Cancel.
5.
After
clicking
Start,
a
progress
bar
displays
indicating
the
status
of
the
formatting
process.
After
the
formatting
completes,
a
message
displays
indicating
that
the
formatting
process
was
successful.
6.
To
exit
the
program
without
creating
a
boot
disk,
click
Cancel.
Notes:
a.
Creating
a
boot
disk
requires
formatting
the
Memory
Key.
This
will
delete
all
files
that
are
on
the
Key.
b.
If
you
begin
the
formatting
process,
you
will
not
be
able
to
abort
it
before
it
ends.
c.
Do
NOT
remove
the
Memory
Key
while
formatting,
and
be
sure
to
close
all
applications
that
might
use
the
Memory
Key.
Booting
your
computer
with
the
IBM
Memory
Key
To
boot
your
computer
with
the
IBM
Memory
Key,
do
the
following:
1.
Turn
off
your
system.
Insert
the
boot
Memory
Key
into
any
available
USB
slot.
2.
Turn
on
your
system
and
use
the
steps
outlined
in
your
desktop
or
mobile
computer
documentation
to
access
your
BIOS
settings.
Locate
the
section
that
determines
the
Boot
or
Startup
Order
of
the
disks
on
your
desktop
or
mobile
computer.
3.
Change
the
order
to
the
following:
v
Legacy
diskette
drive
(might
not
be
applicable
depending
on
your
desktop
or
mobile
computer
configuration)
v
ATAPI
CD-ROM
drive
or
optical
drive
v
Hard
Drive
-
USB
Memory
Key
v
Hard
Drive
-
your
main
hard
disk
drive
or
drives
with
your
operating
system
or
data
files
4.
Save
your
setting
changes
and
exit
the
BIOS.
5.
Restart
your
computer.
It
should
boot
to
a
DOS
prompt
using
the
Memory
Key.
Troubleshooting
v
Creating
a
boot
disk
on
a
key
with
a
Privacy
Zone:
If
you
previously
created
a
Privacy
Zone
on
your
Memory
Key
(using
the
KeySafe
II
application),
you
will
need
to
delete
this
Privacy
Zone
before
running
the
boot
application.
The
way
to
delete
this
Privacy
Zone
is
by
running
KeySafe
II
and
setting
the
Privacy
Zone
to
″0″.
For
more
information,
refer
to
the
KeySafe
II
manual
on
the
CD.
v
Creating
a
boot
disk
on
a
write-protect
enabled
key:
If
you
previously
set
your
key
to
be
write
protected
(using
MyKey
application),
you
will
need
to
disable
this
feature
before
you
run
the
boot
application.
For
more
information,
refer
to
the
MyKey
manual
on
the
CD.
v
Using
multiple
Memory
Keys
simultaneously:
If
you
have
inserted
more
than
one
Memory
Key,
you
will
be
prompted
to
remove
the
keys,
and
leave
only
the
key
you
want
to
use
as
a
boot
disk
plugged
in.
6-2
IBM
USB
2.0
Memory
Keys:
User’s
Guide


