9
Connecting power
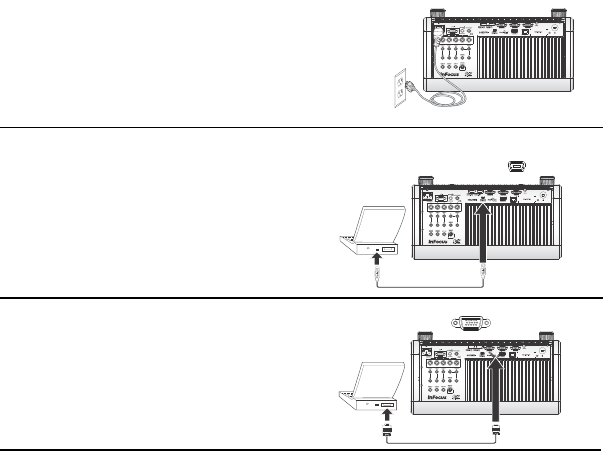
Connect the black power cord to the Power connector on the rear of the
projector and to your electrical outlet. The Power light on the Status
Indicator Panel (page 15) turns amber.
NOTE:
Always use the power cord that shipped with the projector.
Connecting a computer source
DisplayLink
If you have a Windows or Macintosh computer, connect the USB cable
between your computer's USB port and the projector's DisplayLink
connector*. Then to begin installation of the DisplayLink software:
Windows: Follow the instructions on the screen.
Macintosh:
A folder will open containing a file named DisplayLink
Installer.pkg. Open that file and follow the instructions on the screen.
* Fo
r detailed DisplayLink instructions and troubleshooting, and to download the
latest DisplayLink software, go to www.infocus.com/support/displaylink.
VGA connection
Connect one end of the provided computer cable to the VGA 1 or VGA 2
connector on the projector and the other to the VGA connector on your
computer. If you are using a desktop computer, you will need to disconnect
the monitor cable from the computer’s video port first (you can connect this
monitor cable to the Monitor Out connector on the projector, see next page).
HDMI 1.3 connection
HDMI is a standard, uncompressed, all-digital audio/video interface.
HDMI provides an interface between sources, such as set-top boxes, DVD
players, and receivers and your projector. Plug an HDMI cable into the
video out connector on the video device and into either the HDMI 1 or HDMI
2 connector on the projector.
To take advantage of HDMI 1.3 Deep Color (30 bit) you must have a 1.3-
c
ompatible source.
RGBHV connection
Connect one end of the BNC cable to the computer and the other end of the
cable into the BNC connectors on the projector.
Connect power cord
MOLEX
MOLEX
Connect USB cable
Connect computer cable


