44
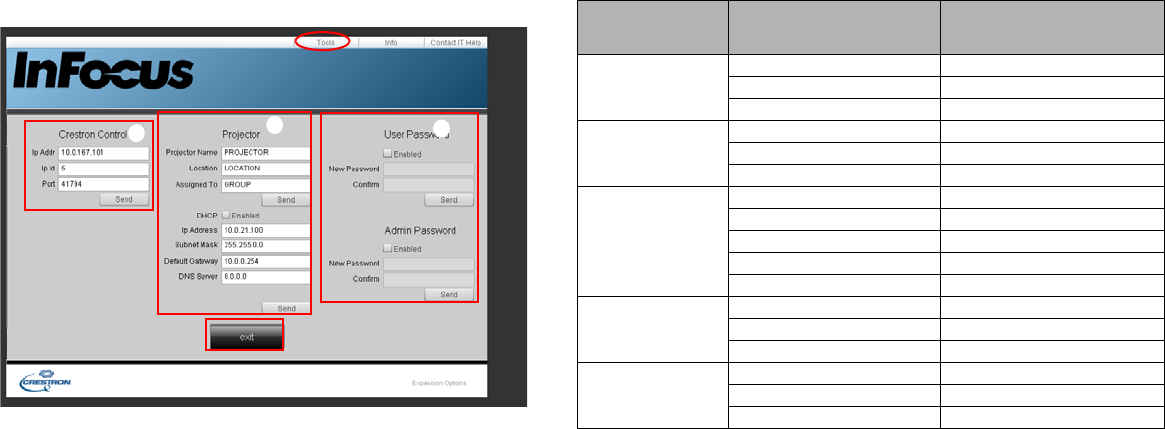
2 The Tools page allows you to manage the projector, configure the LAN
control settings and remotely access the network operations of this projector.
iii
ii
i
i. This area is only used with a Crestron Control System. Please contact Cre-
ston or refer to the Crestron user manual for setup information.
ii. This area is used for naming the projector, associating it with a particular
location, assigning a responsible party to it, and adjusting network settings.
iii. This area is used to set User and Admin passwords. When password protec-
tion is enabled, unauthorized changes to the projector configuration will be
avoided.
• To prevent errors, only enter alphanumeric characters on the Tools page.
• After configuring the settings, press the Send button and the data will be
saved in the projector.
• Press exit to go back to the Crestron remote network operation page.
Please pay attention to the input length and character limitations (including
character and punctuation restrictions) listed below:
Category Item Input-Length
Maximum Number of
Characters
Crestron Control
IP Address 15
IP ID 2
Port 5
Projector
Projector Name 10
Location 9
Assigned To 9
Network
Configuration
DHCP (Enabled) (N/A)
IP Address 15
Subnet Mask 15
Default Gateway 15
DNS Server 15
User Password
Enabled (N/A)
New Password 20
Confirm 2
Admin Password
Enabled (N/A)
New Password 20
Confirm 20
/ > < $ % + \ ' " are prohibited.


