


NetScreen-200 Series 15
3
Chapter 3
Configuring the Device
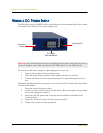
This chapter describes how to perform initial configuration on a NetScreen-200 Series
device once you have mounted it in a rack or desktop, plugged in the necessary cables,
then turn the power ON.
Topics in this chapter include:
• “Operational Modes” on page 16
– “Transparent Mode” on page 16
– “Route Mode” on page 16
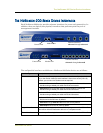
• “The NetScreen-200 Series Device Interfaces” on page 17
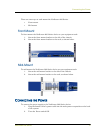
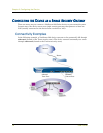
• “Connecting the Device as a Single Security Gateway” on page 18
– “Connectivity Examples” on page 18
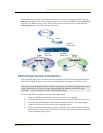
– “Performing Device Connection” on page 19
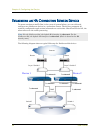
• “Establishing an HA Connection Between Devices” on page 20
• “Performing Initial Connection and Configuration” on page 22
– “Establishing a Terminal Emulator Connection” on page 22
– “Changing Your Admin Name and Password” on page 23
– “Setting Port and Interface IP Addresses” on page 23
• “Configuring the Device for Telnet and WebUI Sessions” on page 25
– “Starting a Console Session Using Telnet” on page 25
– “Starting a Console Session Using Dialup” on page 26
– “Establishing a GUI Management Session” on page 26
• “Asset Recovery” on page 28
Note: You must register your product at ww w.juniper.net/support/ so that certain ScreenOS
services, such as the Deep Inspection Signature Service, can be activated on the device.
After registering your product, use the WebUI or CLI to obtain the subscription for the
service. For more information about registering your product and obtaining subscriptions
for specific services, see the “System Parameters” chapter in Volume 2 of the NetScreen
Concepts & Examples ScreenOS Reference Guide.
Note: If you access the device for the first time using the ScreenOS WebUI graphical
interface, the Initial Configuration Wizard appears when you log in to the WebUI. This
Wizard guides you through the configuration described in this chapter. For more
information about starting the Initial Configuration Wizard, refer to the Juniper Networks
NetScreen-200 Series Getting Started Guide.