


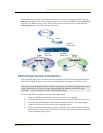


Asset Recovery
NetScreen-200 Series 29
Using the Asset Recovery Pinhole to Reset the Device
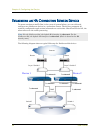
You can also reset the device and restore the factory default settings by pressing the asset
recovery pinhole. To perform this operation, you need to make a console connection, as
described in “Establishing a Terminal Emulator Connection” on page 22.
1. Locate the asset recovery pinhole on the front panel (see “The Front Panel” on
page 3). Using a thin, firm wire (such as a paper clip), push the button located
behind the asset recovery pinhole for four to six seconds.
A serial console message states that the “Configuration Erasure Process has
been initiated” and the system sends an SNMP/SYSLOG alert. The Status LED
blinks amber once every second.
After the first reset is accepted, the power LED blinks green. The serial console
message now reads, “Waiting for 2nd confirmation.”
2. Release the button for one second.
3. Push the button again for four to six seconds. A serial console message states
“Second push has been confirmed.”
The Status LED lights amber for one-half second, then returns to the blinking
green state. Continue to press the button until the message “Configuration
Erase sequence accepted, unit reset.” The system generates SNMP and SYSLOG
alerts to configured SYSLOG or SNMP trap hosts.
4. Release the button.
5. The device now erases the configuration and restarts.
If you do not follow the complete sequence, the reset process cancels without any
configuration change and the serial console message states, “Configuration Erasure
Process aborted.” The status LED returns to blinking green. If the unit did not reset, an
SNMP alert is sent to confirm the failure.
Note: During a reset, there is no guarantee that the final SNMP alert sent to the
receiver before the reset will be received.