


Connecting the Device as a Single Security Gateway
NetScreen-200 Series 19
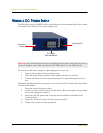
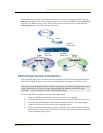
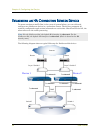
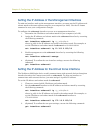
In the following example, a NetScreen-208 device connects to a protected LAN through
ethernet1 (bound to the Trust security zone) and to a protected DMZ through ethernet2
(bound to the DMZ security zone). The device connects externally to a router through
ethernet3 (bound to the Untrust security zone).
Performing Device Connection
The NetScreen-204 device has four ethernet interfaces and the NetScreen-208 has eight.
The default vlan1 IP address and subnet mask of these interfaces is 192.168.1.1/24.
To set up the NetScreen-200 Series network connections:
1. Place the NetScreen-200 Series device in a rack or on a desktop.
2. Confirm that the power connection to the device is turned OFF (“0” pressed in).
3. Connect the provided power cable from the power outlet to the power supply.
4. Connect the device to the network (see examples above).
5. Turn the NetScreen-200 device power switch ON, then turn the other network
device power switches ON. (If all cables are connected correctly, the link light for
each connection glows green.)
Note: If you have multiple NetScreen-200 Series devices, install and configure them one at
a time. Because they all share the same default vlan1 IP address and subnet mask
(192.168.1.1/24), you might encounter IP address conflicts.
Router
Internet
ethernet2
DMZ Zone
ethernet1
Trust Zone
ethernet3
Untrust Zone