


Scanning
71 www.kodak.com/go/aiosupport
Changing the scan settings for scanning from the control panel
If you want to adjust the scan settings that the printer uses, do so before you scan
from the printer control panel.
NOTE: These settings do not apply to Scan to Email or Scan to Network Folder. To
change scan settings for scanning to email or to network folder, see
Setting
options for scan to email, page 24 or Setting scan settings for scan to
network folder, page 29.
1. Open Home Center Software, then open the Printer Tools (WINDOWS OS) or
To o l s (MAC OS) window.
NOTE: To get to Printer Tools without Home Center Software (WINDOWS OS
only), select
Start > All Programs > Kodak > KODAK AiO Printer Tools.
2. Under the Tools heading, select Printer Scan Settings.
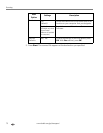
3. Adjust settings for scanning documents and pictures:
a. To select a program that scanned images or documents will appear in when
you scan from the printer control panel:
(1) Select the General tab.
(2) Under the Program List heading, click next to the currently selected
program.
(3) From the list, select the program in which you want the scanned files to
open.
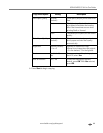
b. To adjust settings for scanning documents, select the Document tab, then
select an option for each setting:
Setting Options
File format .pdf
.rtf (available only when connected to a computer with
WINDOWS OS)
.tif
.jpg
.bmp (available only when connected to a computer with
MAC OS)
Resolution (dpi) 75
150
200
300
File Save Prompt for File Name and Location
Automatically Save - specify:
• Base name; by default, scanned files are named “scan1”,
“scan2”, and so on
• Location (folder) where the scanned files will be saved