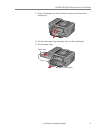
Safety and Warranty Information
15 www.kodak.com/go/aiosupport
Warranty Information
Limited Warranty
Kodak warrants Kodak consumer electronic products and accessories (“Products”), excluding batteries, to be
free from malfunctions and defects in both materials and workmanship for one year from the date of
purchase. Retain the original dated sales receipt. Proof of the date of purchase will be required with any
request for warranty repair.
Limited Warranty Coverage
Warranty service is only available from within the country where the Products were originally purchased. You
may be required to send Products, at your expense, to the authorized service facility for the country where the
Products were purchased. Kodak will repair or replace Products if they fail to function properly during the
warranty period, subject to any conditions and/or limitations stated herein. Warranty service will include all
labor as well as any necessary adjustments and/or replacement parts. If Kodak is unable to repair or replace
a Product, Kodak will, at its option, refund the purchase
price paid for the Product provided the Product has
been returned to Kodak together with proof of the purchase price paid. Repair, replacement, or refund of the
purchase price are the sole remedies under this warranty. If replacement parts are used in making repairs,
those parts may be remanufactured or may contain remanufactured materials. If it is necessary to replace the
entire Product, it may be replaced with a remanufactured Product. Remanufactured Products, parts and
materials are warranted for the remaining warranty term of the original Product, or 90 days after the date of
repair or replacement, whichever is longer.
Limitations
This warranty does not cover circumstances beyond Kodak’s control. This warranty does not apply when
failure is due to shipping damage, accident, alteration, modification, unauthorized service, misuse, abuse, use
with incompatible accessories or attachments (such as third party ink or ink tanks), failure to follow Kodak’s
operation, maintenance or repacking instructions, failure to use items supplied by Kodak (such as adapters
and cables), or claims made after the duration of this warranty. KODAK MAKES NO OTHER EXPRESS OR
IMPLIED WARRANTY FOR THIS PRODUCT, AND DISCLAIMS THE IMPLIED WARRANTIES AND
CONDITIONS OF MERCHANTABILITY AND FITNESS FOR A PARTICULAR PURPOSE. In the event that the
exclusion of any implied warranty is ineffective under the law, the duration of the implied warranty will be one
year from the purchase date or such longer period as required by law. The option of repair, replacement, or
refund is Kodak’s only obligation. Kodak will not be responsible for any special, consequential or incidental
damages resulting from the sale, purchase, or use of this product regardless of the cause. Liability for any
special consequential or incidental damages (including but not limited to loss of revenue or profit, downtime
costs, loss of the use of the equipment, cost of substitute equipment, facilities or services or claims of your
customers for such damages resulting from the purchase, use or failure of the Product), regardless of cause,
or for breach of any written or implied warranty is expressly disclaimed.
Yo ur Ri gh ts
Some states or jurisdictions do not allow exclusion or limitation of incidental or consequential damages, so
the above limitation or exclusion may not apply to you. Some states or jurisdictions do not allow limitations on
how long an implied warranty lasts, so the above limitation may not apply to you. This warranty gives you
specific rights, and you may have other rights which vary from state to state or by jurisdiction. Your statutory
rights are not affected.
Outside the United States and Canada
In countries other than the United States and Canada, the terms and conditions of this warranty may be
different. Unless a specific Kodak warranty is communicated to the purchaser in writing by a Kodak company,
no warranty or liability exists beyond any minimum requirements imposed by law, even though defect,
damage, or loss may be by negligence or other act.