


27
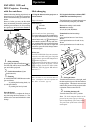
Operation
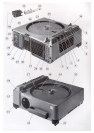
EKTAPRO 5020 and
9020 Projector: Focusing
with the autofocus
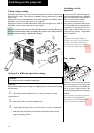
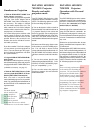
1. Slide positioning
Press lightly the slide forward button (1).
The first slide will be moved into the slide
gate and will be projected.
2. Switch the autofocus (7) on
(Push button in).
3. Focusing
a) with KODAK EKTAPRO lenses or other
gear rack lenses:
- by turning the focusing knob (11)
b) with spiral lenses:
- by turning the lens by hand
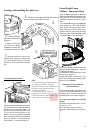
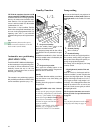
Override feature
You can, however, re-adjust the focus at
any time using the focus buttons (2). The
autofocus is re-activated with the next slide
change.
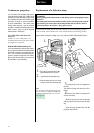
Manual refocusing during projection is no
longer necessary as the built-in autofocus
device will automatically give the best def-
inition.
However, before you start, the first slide
has to be manually focused by turning the
knob for gear rack lenses (11) or by turning
the spiral lens (the lens mount should be
about in middle position) :
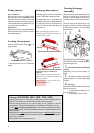
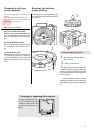
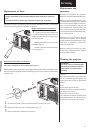
I. Using the buttons on the projector or
remote control*
Single Movement:
Press button (1)
forwards
backwards
Quick search and zero positioning:
To transport the tray quickly in either direc-
tion, press and hold down the slide change
button-backwards (1) [ ] until the posi-
tion wanted is reached. The tray will, how-
ever, automatically stop at 0 and will remain
in this position. If you want to repeat the
search run, press the slide change button-
backwards again.
Please note
Your EKTAPRO Slide Projector can sense
when there is a slide in the gate. Only then
will the shutter open and the lamp achieve
its optimum brightness.
In exceptional case the feature can also be
switched off with the IR Remote Control
(does not apply for the EKTAPRO 3020).
To do this, enter the figures 555 and con-
firm with "*".
*There are three different remote controls avail-
able as accessories to your EKTAPRO Slide Pro-
jector. (Description of the most important fea-
tures under Accessories page 35):
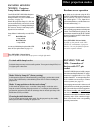
II. Using the built-in interval timer (EKT-
APRO 5020 and 9020 Projectors)
The built-in timer (6) enables the projector
to automatically transport your slides.
Eleven time settings can be made:
Marked time settings:
1; 2; 3; 4; 5; 10; 30; 60 sec
Unmarked interim time settings:
8 sec
(timer position between 5 and 10 sec)
20 sec
(timer position between 10 and 30 sec)
45 sec
(timer position between 30 and 60 sec)
Slide changing
1. Setting the timer:
Turn the timer clockwise, to the right, until
the time required agrees with the indicator
on the projector. The timer is now activated
and the first picture will be projected after
expiration of the set time interval.
2. Switching the timer off:
Turn the timer to the OFF position.
Note: The slide transport button can be
pressed at any time to project the next
slide independently of the timer setting .
The preset time of the timer will not be
interrupted.
2.
3.
1.
1.
2.