


26
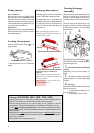
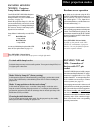
Place the projector on a firm, vibration free
base for stable and smooth operation.
For professional use we recommend the
special projection racks available from deal-
ers. The projector may be elevated plus or
minus 30
o
from the horizontal along the
projection axis.
Note: Operating the projector at its
maximum angle setting may reduce the
average lamp life time!
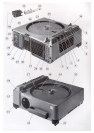
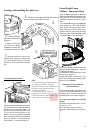
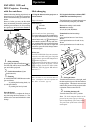
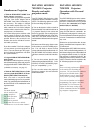
Setting up the projector
Push the slide-forward button (1) to
project a slide.
Focusing the image
(manually)
The picture focus can be altered at any time
during the projection by using the focus
buttons (2) on the projector or the corre-
sponding buttons on the remote control.
The first slide, at the beginning of every
projection, must be focused by turning the
knob for gear rack lenses (11) or by turning
the spiral lens:
1. Slide positioning
Press lightly the slide forward button (1).
The first slide will move into the slide gate
and will be projected.
2. Move the lens mount to the middle
position
Repeatedly press the focus buttons (2)
until-
3. - the indicator pointer of the centre
position indicator (9) reaches the middle
position.
4. Focusing
a) with KODAK EKTAPRO Lenses or any
other gear rack lens:
- by turning the focusing knob (11)
b) with spiral lenses:
- by turning the lens by hand.
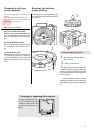
Line-up (EKTAPRO 4020, 5020, 7020, 9020)
Aligning the projectors i.e. fully fading up all projectors, in multivision operation is
difficult, since dissolve units often do not provide this kind of option.
With the Line-up feature you can turn the light of every projector on and off
independently. This means the projectors can be aligned or checked at any time.
You can only set the line-up on the projector. (The external controlling via P-Bus is
rejected during setting. With line-up standby will be also switched off and the shutter
will be opened):
Line-up on: Press both transport buttons on the projector simultaneously for at least
1 second. The lamp now lights up at maximum output and the zero position indicator
(green LED, 24) flashes.
Line-up off: Press the standby button (3).
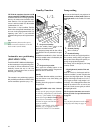
Important! Proper ventilation is
required!
Check that the projector can draw-in
sufficient cool air and that warm air can
be freely expelled.
Keep air inlet (5) and air outlet (19)
free from obstruction!
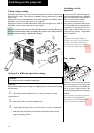
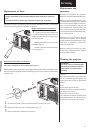
Fitting the lens
Leveling the projector
Gear rack lenses:
Gear rack lenses (such as KODAK Slide
Projection FF Lenses) are pushed into the
lens mount housing. A slide tray index (80
slides) for copying can be found on page 86.
This is ideal for archiving and an index copy
can be made for each slide tray.
Spiral lenses:
Spiral grooved lenses are screwed clock-
wise (from front of the projector) into the
lens mount housing.
max. 30º
max. 30º
.Turn the projector feet (13) to adjust the
height.
1.
2.
4.
3.
4.