


7-12 A-61133 March 2003
• Enable Fax Header Page if you want the header page printed along
with your fax. The default is no Fax Header Page.
• The fax will be delivered when you send it if you do not enable the
Time option and enter a specific time.
• The fax will be delivered when you send it if you do not enable the
Date option and enter a specific date.
• If the date is prior to the current date (even if it is set to a future year),
the fax will be sent immediately.
Faxing or emailing
individual images
To fax or email an individual image immediately:
1. If not already connected, connect to a VNN and Fax/eMail via the
Navigate>Image Server>Connect… menu option.
2. Retrieve the desired image using the scanner.
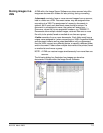
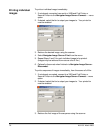
3. Select Navigate>Image Server>Fax/eMail from the menu.
4. Fill the necessary information in the Fax/eMail dialog box. (See the
section entitled “The Fax/eMail dialog box” in this chapter.)
5. Click OK when finished.
6. Repeat Steps 2 through 5 for each individual image to be faxed or
emailed. (Images may be retrieved from various rolls of film.)
7. Optionally disconnect when finished via Navigate>Image Server>
Disconnect.
To fax or email a sequence of images immediately, from the same roll of
film:
1. If not already connected, connect to a VNN and Fax/eMail via the
Navigate>Image Server>Connect… menu option.
2. Retrieve the first image of the sequence using the scanner.
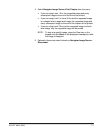
3. Select Navigate>Image Server>Fax/eMail Chapter from the
menu.
• If you are using Level 1 film, the requested image and every
subsequent image to the end of the film will be printed.
• If you are using Level 2 or Level 3 film and the requested image
is a chapter level or page level image, the requested image and
every subsequent image to the end of the chapter will be printed.
• If you are using Level 3 film and the requested image is a book
level image, only the requested image will be printed.
NOTE: To stop at a specific image, press the Clear key on the
keypad and click Abort on the displayed message box after
the image is displayed.
4. Fill the necessary information in the Fax/eMail dialog box. (See the
section entitled “The Fax/eMail dialog box” in this chapter.)