


A-61133 March 2003 3-15
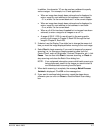
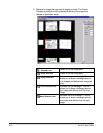
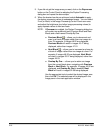
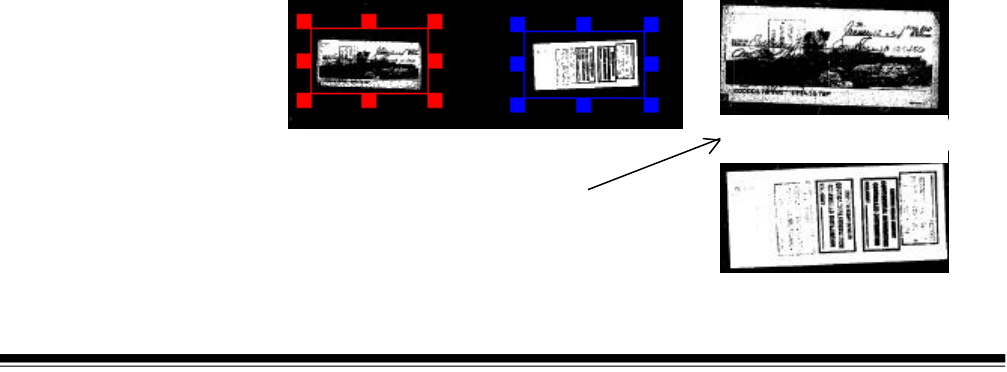
3. Either a red rectangle or blue rectangle will be automatically
displayed, or one green rectangle, depending on previous actions.
• The red rectangle is used to define the front, and the blue
rectangle is used to define the back. You can either use the
handles to resize the current rectangles or use the Front and
Back selection tools to draw new rectangles. Click with the left
mouse button to delete the current rectangle. Press and hold the
left mouse button and drag, to redraw a rectangle of the desired
size in the desired locations.
• The green rectangle provides the capability to define both front
and back with one rectangle.
NOTE: When the left mouse button is released, duplex
processing will be automatically initiated, the Duplex
Processing dialog box will close and the selected area
will be displayed in the Image pane. You must specify
border options, if desired, prior to using the Image Area
tool.
When the front and back areas are defined and any border options
are designated, click OK.
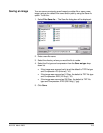
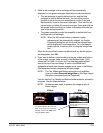
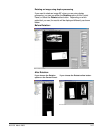
4. If you want to define a clear border(s) at the top, middle and bottom
of the image, you can make an entry in the Borders fields. Valid
values are 0 to 1000. A value in the Top field designates a blank
area at the top of the front image. A value in the Middle field
designates a blank area between images and a value in the Bottom
field designates a blank area below the back image.
NOTE: The Top, Middle and Bottom options are only available
when you select Scanned Image Size on the Page Layout
dialog box (accessed from the Output tab).
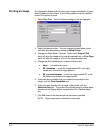
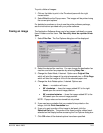
You can use the Top, Middle and Bottom border areas for annotation
purposes. See the example below.
NOTE: No attempt was made to optimize the image quality of
these images.
Before
(in Duplex Processing dialog box)
After
(In Image area)
Dear Mr. Smith:
Here is the check
you requested.
The space between the front and
back of the check was created by
entering a value in the Middle field
using the Border option.