


5
Image Insert
When inserting an image into a finished set from a source such as a hard cover
book or 3D object like a wristwatch, the image insert mode functionality works
extremely well with these job requirements.
Place eight 8.5" x 11" originals face up into the RADF.
Have a hard cover book or magazine near by; for the images that are to be inserted.
You will be inserting the front cover after page 3 and the rear cover after page 5.
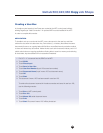
1. Application
, Sheet/Cover/Chapter insert
2. Image insert , Index P… and press #3 on copier keypad
3. Index P… and press #5 on the copier keypad OK
Pressing #3 & #5 will sequentially position the inserts into the finished set.
4. Press start. The eight originals in the RADF will be scanned.
5. Place front of hard cover book onto platen glass , Start key
6. Place back of hard cover book onto platen glass , Start key
7. When scanning is complete , Finish , Start key
Combine Originals
Copying ID Badges/Insurance Cards/Drivers License (front & back)
onto the same side of an 8.5" x 11" sheet of paper
This is a major application with banks, insurance and mortgage companies.
For example; all residential mortgage applications must be accompanied be 2 different
ID’s usually a drivers license & social security card.
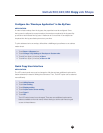
1. Combine originals
2. 4 in 1 , Vertical
3. Basic , Zoom , x1.0 , Paper , 8.5" x 11" (portrait)
4. OK
5. Place top side of original (ID badge or drivers license) onto left side
of platen paper guide , Start Key
6. Turn original (ID badge or drivers license) over onto side two , Start key
7. When scanning is complete , Finish , Start key
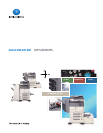
bizhub 500
/
420
/
360 Copy Job Shops