


4: Installation of EDS4100
EDS User Guide 34
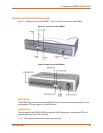
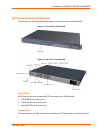
Physically Installing the EDS4100
Finding a Suitable Location
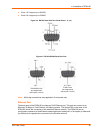
Place the EDS4100 on a flat horizontal or vertical surface. The EDS4100 comes with
mounting brackets installed for vertically mounting the unit, for example, on a wall.
If using AC power, avoid outlets controlled by a wall switch.
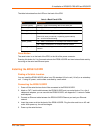
Connecting the EDS4100
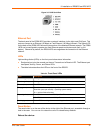
Observe the following guidelines when attaching serial devices:
All four EDS4100 serial ports support RS-232 devices.
Alternatively, ports 1 and 3 support RS-422/485 devices.
To connect an EDS4100 serial port to another DTE device, use a null modem cable.
To connect the EDS4100 serial port to a DCE device, use a straight-through (modem) cable.
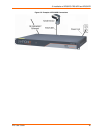
Connect the EDS4100 to one or more serial devices.
1. Power off the serial devices.
2. Attach a serial cable between the EDS4100 and each serial device.
3. Connect an Ethernet cable between the EDS4100 Ethernet port and your Ethernet network.
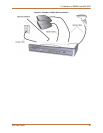
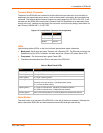
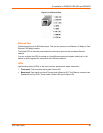
4. Power-up the EDS4100. Use one or more of the following methods.
These power-up methods can be used in combination to provide redundant backup power to
the unit.
PoE: Power is supplied over the Ethernet cable by an Ethernet switch or a mid-span
device.
Barrel power connector: The barrel power connector supports a power range of 9 to 30
VDC. Insert the round end of the supplied power cord into the barrel power connector on
the back of the EDS4100. Plug the other end into an AC wall outlet.
Terminal block connector: The terminal block connector supports a power range of 42
VDC to 56 VDC. Attach the power source to the terminal block connector on the back of
the EDS4100.
As soon as you plug it in, the EDS4100 powers up automatically, the self-test begins, and
Evolution OS™ starts.
5. Power up the serial devices.