


4076-0XX
Repair Information 45
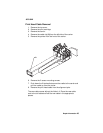
carrier guide, push down the front, bottom edge. It will snap under
the carrier guide.
To install the right side frame onto the middle frame, align the right
side frame latch with the latching surface on the mid frame before
you align the roller shafts and carrier guide. It may be easier to do
this with the machine on its left side.
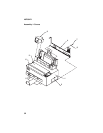
Rubber Backer Removal
1. Remove the top cover.
2. Remove the print cartridge.
3. Remove the print head cable.
4. Remove the rubber backer from the carrier.
Small Feed Roller Assembly Removal
1. Remove the top cover.
2. Remove the auto sheet feed.
3. Remove the paper guide
4. Carefully remove the paper release lever.
5. Remove the bushing from the left end of the small feed roller
shaft. To do this, pull the tab and rotate the bushing.
6. Slide the small feed roller assembly to the left and lift it out of the
machine.
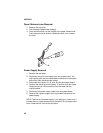
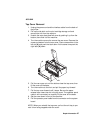
Star Roller Removal
1. Remove the top cover.
2. Move the carrier in line with the opening on the carrier transport
motor frame.
3. Reach through the opening and pull the belt from the carrier.
4. To unlock the carrier guide rod latches, rotate the rod top-to-rear.
Gently push the carrier guide rod latches at each end of the rod
to the rear and lift up the rod until the sensor on the carrier clears
the encoder strip. Place the carrier on top of the paper guide.
5. A latch on the top front end of each side frame holds the trans-
port motor frame in place. Push up the latches on the front of the
side frames and pivot the carrier transport motor frame down
and out of the side frames. Place the carrier transport motor
frame face down in front of the machine.
6. Remove the star roller by pushing it forward off the mounting peg
in the carrier transport motor frame.