


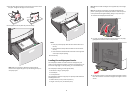


Area Jam numbers What to do
6 431–438 Push the button to slide the finisher to the right,
open the finisher door, and then remove the
jammed paper.
7 455 Open staple door, remove the staple cartridge,
and then remove the jammed staple.
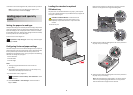
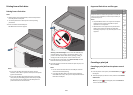
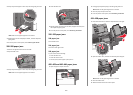
200 paper jam
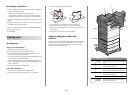
1 Open the side door of the printer.
CAUTION—HOT SURFACE: The inside of the printer might
be hot. To reduce the risk of injury from a hot component,
allow the surface to cool before touching.
2 Firmly grasp the jammed paper, and then gently pull it out.
Note: Make sure all paper fragments are removed.
3 Close the side door of the printer.
4 From the printer control panel, touch Continue, jam cleared.
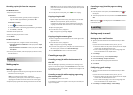
201 paper jam
1 Open the side door of the printer.
CAUTION—HOT SURFACE: The inside of the printer might
be hot. To reduce the risk of injury from a hot component,
allow the surface to cool before touching.
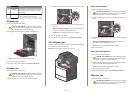
2 Determine where the jam is located, and then remove it:
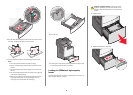
a If paper is inside the fuser unit, then open the fuser access door.
1
2
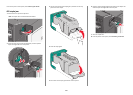
b Firmly grasp the jammed paper on each side, and then gently
pull it out.
Warning—Potential Damage: Do not touch the center of
the fuser unit. Doing so will damage the fuser.
Note: Make sure all paper fragments are removed.
3 Close the side door of the printer.
4 From the printer control panel, touch Continue, jam cleared.
202–203 paper jams
If paper is visible in the standard exit bin, then firmly grasp the paper
on each side, and then gently pull it out.
Note: Make sure all paper fragments are removed.
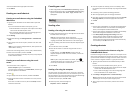
Paper jam in the fuser
1 Open the side door of the printer.
CAUTION—HOT SURFACE: The inside of the printer might
be hot. To reduce the risk of injury from a hot component,
allow the surface to cool before touching.
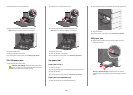
2 If paper is visible inside the fuser unit, then open the fuser access
door.
1
2
3 Firmly grasp the jammed paper on each side, and then gently pull
it out.
Warning—Potential Damage: Do not touch the center of the
fuser unit. Doing so will damage the fuser.
Note: Make sure all paper fragments are removed.
4 Close the side door.
Paper jam under the fuser
1 Open the side door of the printer.
CAUTION—HOT SURFACE: The inside of the printer might
be hot. To reduce the risk of injury from a hot component,
allow the surface to cool before touching.
2 If paper is visible under the fuser, then firmly grasp the jammed
paper on each side, and then gently pull it out.
Note: Make sure all paper fragments are removed.
3 Close the side door of the printer.
4 From the printer control panel, touch Continue, jam cleared.
230 paper jam
1 Open the side door of the printer.
CAUTION—HOT SURFACE: The inside of the printer might
be hot. To reduce the risk of injury from a hot component,
allow the surface to cool before touching.
15