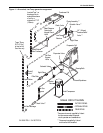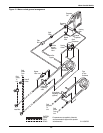
Air-Cooled Models
22
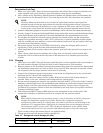
Dehydration/Leak Test
1. Make sure unit is OFF. Open all disconnect switches and pull all fuses except control fuses. On
units supplied with circuit breakers, open all breakers except for the transformer.
2. Add a jumper to the Fan Safety Switch between Common and Normal Open and disconnect the
wire connected to the Normally Closed. Turn unit disconnect ON. (Fan operation not required.)
3. Connect refrigeration gauges to the suction and discharge service valves of the compressor and open.
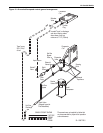
4. Attach a “jumper” hose from the Rotalock fitting on the outlet of the receiver and the Schrader fitting
on the liquid header of the condenser. Front seat the Rotalock valve approximately two turns.
5. To energize the liquid line solenoid valve(s) through the control system, set the temperature
setpoint (see operation manual) to 60°F (15°C) and set the % relative humidity setpoint higher
than the conditioned room ambient to ensure that solenoid valves and hot gas bypass valves are
open during the dehydration process.
6. Pressurize system circuit(s) to 150 PSIG (1034 kPa) by using dry nitrogen with a trace of
refrigerant. Check system for leaks with suitable leak finder.
7. After completion of leak testing, release test pressure (per local code) and pull a vacuum on the
system.
8. After 4 hours, check pressure readings and, if they have not changed, break vacuum with
refrigerant. Pull a second and third vacuum of 250 microns or less. Recheck pressure after
2 hours.
3.5.4 Charging
1. Make sure unit is OFF. Open all disconnect switches and, on units supplied with circuit breakers,
open all breakers. Replace all fuses for the Fan and Compressors or close breakers.
2. Remove jumper on the Fan Safety Switch and reconnect the system wire connections. Ensure that
all operational components are clear of debris. Turn unit ON. (Fan operation is required.) Check
the evaporator fan for proper rotation and correct if necessary.
3. Connect the refrigerant gauge charging hose to the drum of refrigerant and to the suction and
discharge service valves of the compressor(s).
4. Calculate the amount of charge for the system. Weigh in as much of the system charge as
possible. Refer to the unit, condenser and refrigerant line charge tables.
5. Set the control temperature setpoint (see operation manual) to 60°F (15°C) and set the % relative
humidity setpoint higher than the conditioned room ambient to ensure that solenoid valves and
hot gas bypass valves are open during the charging procedure. You may have to bypass the
LP Switch (low pressure switch) to start the compressors and stop short cycling. Reset the Head
Pressure switch(es) if open.
6. Add refrigerant (R407C liquid or R22 vapor per unit nameplate) to the suction side of the
compressor until there is sufficient pressure to energize the low pressure switch.
Then you may remove the manual bypass you applied earlier.
7. Charge the unit until the proper charge is weighed in.
NOTE
The above allows the technician to use unit 24 VAC power and controls to open liquid line
solenoid valve(s) and hot gas bypass solenoid valve(s) for the dehydration process. If no power
is at the unit disconnect, the technician is to use a separate 24 VAC source rated at 75 VA and
connect to the system liquid line solenoid valve(s) and hot gas bypass solenoid valve(s) directly.
NOTE
When adding refrigerant to an operating system, it may be necessary to add the refrigerant
through the compressor suction service valve. Because the refrigerant leaving the
refrigerant cylinder must be in a liquid state, care must be exercised to avoid damage to the
compressor. It is suggested that a sight glass be connected between the charging hose and
the compressor suction service valve. This will permit adjustment of the cylinder hand
valve so that liquid can leave the cylinder while allowing vapor to enter the compressor.
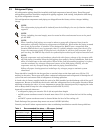
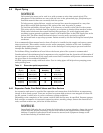
Table 10 Refrigerant control settings psi (kPa)
Low Pressure Cut Out Low Pressure Cut In High Pressure Cut Out
20 (137.9) 65 (448.2) 360 (2482)


