Lightwave Communications PC ServerSwitch 2x16
www.lightwavecom.com Page 12 of 24
3.2.1 System Setup: Port Setup
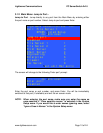
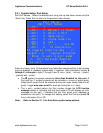
Edit Port Names - Select the desired port using the up and down arrows and the
“Enter” key. Press 'Esc' to return to the previous menu screen.
Port Setup
Edit Port Names
+Port 1
+Port 2 Default is blank
+Port 3 Enter a Port
+Port 4 Name here;
+Port 5 alpha-numerics
+Port 6 and
-Port 7 + - / . ; are OK
+Port 8 15 characters
F8 toggles Inactive msg +/-
keypad + or - toggles autoscan
Enter to edit a port name
; Port Autoscan Enabled
Prev unit Down
Enter any name, up to 15 characters long. Note that case-sensitivity of port names
may be enabled or disabled system-wide, if required. Valid characters include A
through Z, a through z, digits 1 through 9 and 0, and + (plus), - (minus), / (slash),
. (period) and : (colon).
• The
symbol on-screen represents Auto Scan Enabled for this port. A
Port with the symbol showing will be included in a scan of active ports.
Select which ports should be scanned during auto scan mode (default is all
ports). Toggle auto scan on/off for each port using the + or - keys.
• The + and - symbol before the Port number shows the LCD Inactive
message status (+ indicates that the front panel LCD will display an error
message for this port, - indicates that the front panel error message is
disabled for this port). To change this setting, select the Port and press F8
to turn this option On or Off.
Note: Refer to Section 3.1.1 for Auto-Scan system setup options.


