


EN-14
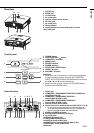
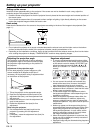
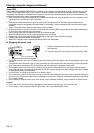
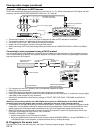
1 Plug the attached power cord into the power cord inlet of
this projector.
2 Plug the other end of the power cord into a power outlet.
• The power cords for use in the U.S. and Europe are included with this projector. Use the appropriate one for your
country.
• This projector uses the power plug of 3-pin grounding type. Do not take away the grounding pin from the power
plug. If the power plug doesn’t fi t your wall outlet, ask an electrician to change the wall outlet.
• The provided power cord for the U.S. is rated at 120 V. Never connect this cord to any outlet or power supply
using other voltages or frequencies than rated. If you use a power supply using other voltage than rated, prepare
an appropriate power cord separately.
• Use 100-240 V AC 50/60 Hz to prevent fi re or electric shock.
• Do not place any objects on the power cord or do not place the projector near heat sources to prevent damage to
the power cord. If the power cord should be damaged, contact your dealer for replacement because it may cause
fi re or electric shock.
• Do not modify or alter the power cord. If the power cord is modifi ed or altered, it may cause fi re or electric shock.
Caution:
• Plug in the power cord fi rmly. When unplugging, hold and pull the power plug, not the power cord.
• Do not plug in or out the power cord with your hand wet. It may cause electric shock.
2
1
Earthing
terminal
Power cord (Example)
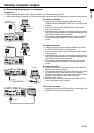
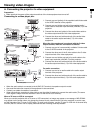
Viewing computer images (continued)
About DDC
The COMPUTER/COMPONENT VIDEO IN-1 terminal of this projector complies with the DDC1/2B standard and the
COMPUTER/COMPONENT VIDEO DVI-D (HDCP) terminal complies with the DDC2B standard. When a computer
supporting this standard is connected to this terminal, the computer will automatically load the information from this
projector and prepare for output of appropriate images.
• After connecting a computer supporting this standard to this terminal, plug the power cord of the projector in the
wall outlet fi rst, and then boot up the computer.
• This projector uses stereo mini plug for its audio input. Check the type of the audio output terminal of the
connected computer and prepare a proper cable for connection. Some computers don't have the audio output
terminal.
• Turn on the power of the projector before that of the computer.
• Additional devices, such as a conversion connector and an analog RGB output adapter, are required depending
on the type of the computer to be connected.
• Use of a long cable may decrease the quality of projected images.
• Also read the instruction manual of the equipment to be connected.
• Images may not be projected correctly, depending on the type of the connected computer.
• Contact your dealer for details of connection.
• When DVI-D signal is input, some signal setting menus are unavailable.
B. Plugging the power cord