


EN-14
Basic operation (continued)
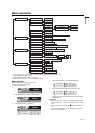
Power-off
Use the following procedure to turn off the projector.
1. Press the POWER button on the control panel or the OFF button
on the remote control.
• The message "POWER OFF? YES : PRESS AGAIN"
appears on the screen.
• To cancel, press any button except the POWER button.
(Some buttons on the remote control don’t function for can-
cel.)
2. Press the POWER button on the control panel or the OFF button
on the remote control within 10 seconds again.
• The lamp will go out and the STATUS indicator will start
blinking.
• Though the lamp goes out at this second press of the
POWER button (or STANDBY button), the air outlet fans con-
tinue operating for approx. 90 seconds to cool down the
lamp. The STATUS indicator will stop blinking.
3. Unplug the power cord.
• The POWER indicator will go out.
• To light the lamp again, press the POWER button (or ON but-
ton). If the lamp doesn’t light up immediately, repeat pressing
the POWER button (or OFF button) two or three times. If it
should still fail to light up, replace the lamp.
Notice:
• When storing the projector in the carrying case, the lens should
face up.
Instant Shut Down
You can turn off this projector just by unplugging the power cord with-
out pressing the POWER button.
• When Power-ON under the high temperature near the lamp after
Instant Shut Down, the audio out and the cooling fan start firstly.
Then the lamp will light up automatically about 90 seconds later
after starting the cooling fan.
• Don't shut down the projector while the STATUS indicator is blink-
ing after the lamp lights up because the lamp's life may be short-
ened.
• Don't turn the projector back on right after shutting it down
because the lamp's life may be shortened. (Wait about 10 minutes
before turning the projector back on.)
• Before shutting down the projector, be sure to close the menu
screen. If you shut down the projector without closing the menu,
the setting data of the menu may not be saved.
• If you shut down the projector while controlling the projector using
the network function, the application software may fail.
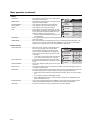
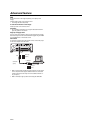
AUTO POSITION button
When the image isn’t projected in the right position with COMPUTER
selected as the input source, follow the procedure below.
1. Project a bright image such as the "Recycle Bin" window on the
full screen.
2. If the screen saver is running, turn it off.
3. Press the AUTO POSITION button.
• If the image is still not in the right position, adjust the image
position using the SIGNAL menu. See page 19.
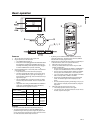
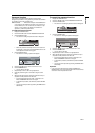
Volume from the speaker
Press the KEYSTONE button on the remote control to switch the KEY-
STONE / VOLUME adjustment. When the VOLUME control bar
appears on the screen, press the VOLUME + or -button to change the
volume from the speaker.
The volume control bar will appear on the screen.
• The volume control bar will disappear about 10 seconds after the
VOLUME button is released.
• When a high-level audio signal, such as a DVD audio signal, is
supplied to the AUDIO IN terminal, the output from the speaker
may be distorted.
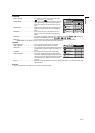
AV mute
The video and audio signals are temporarily muted when the MUTE
button is pressed. To cancel muting, press the MUTE button again.
ANAMORPHIC mode
When playing DVD discs containing data of letterboxed image, press
the 16:9 button. Exit the ANAMORPHIC mode, by pressing the 16:9
button again.
Important:
• When a letterboxed image is kept displayed for a long time before
displaying 4:3 image, the afterimages of the black bars may
appear on the 4:3 image screen. Consult your dealer in this case.
Caution:
• After using the projector, wait 90 seconds for the air outlet fans to
stop. Then unplug the power cord from the wall outlet.
• While cooling down, the STATUS LED keeps blinking green, the
POWER button won’t work till it stops blinking.
• The air outlet fans will run for extra 90 seconds before starting the
projector if it didn't shut down properly ( unplug directly without
pressing POWER button) and the temperature is too high.
• The air outlet fans rotate faster as the temperature around the pro-
jector rises.
• After shut down due to the high temperature, the Status LED is lit
about 10 seconds.
Important:
• Do not display a still picture for a long time because the afterim-
ages may persist on the screen.