


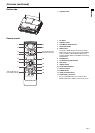
EN-11
ENGLISH
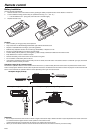
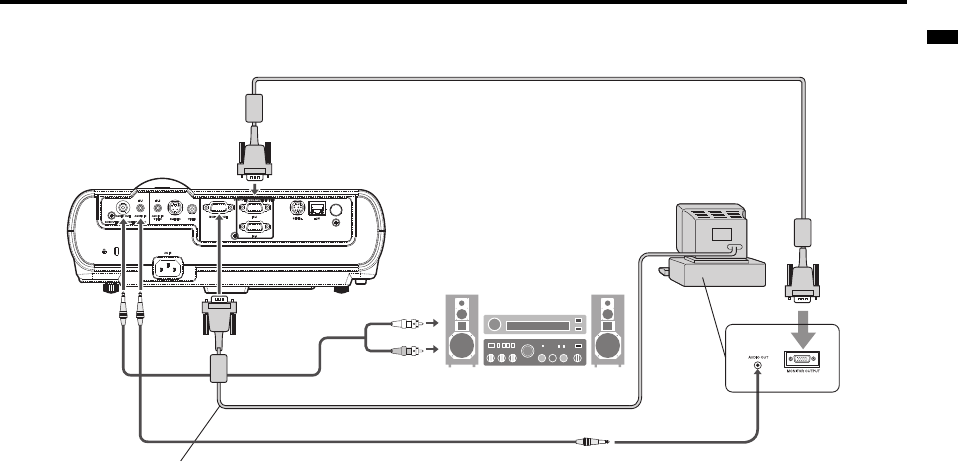
Basic connections (continued)
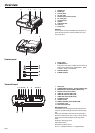
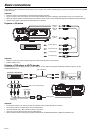
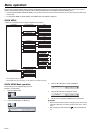
Projector + Computer
For computer with Mini D-SUB
For analog connection:
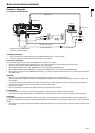
1. Connect one end of the supplied RGB cable to the COMPUTER IN terminal (1, 2) of the projector.
2. Connect the other end of the RGB cable to the monitor port of the computer.
For monitor connection:
Connect the RGB cable from the monitor to the MONITOR OUT terminal of the projector.
• Images may not be displayed correctly depending on the type of the input signal. See the instruction manual of the monitor.
• Signals are coming from the COMPUTER IN terminal (1 or 2) of the projector.
• When STANDBY MODE is set to "LOW", MONITOR OUT is not output during the STANDBY state.
• When STANDBY MODE is set to "STANDARD", the signals from COMPUTER IN-1 are output during the STANDBY state.
• When signals are coming from both COMPUTER IN terminals (1, 2), images are projected from the terminal (1 or 2) currently or last selected in
the projector's menu.
Important:
• When you use a longer RGB cable instead of the provided cable, the image may not be projected correctly.
• Some computers require additional connectors or analog RGB output adapters to be connected with this projector. Contact your dealer for fur-
ther information.
• This projector uses stereo mini jack for its audio input. Check the type of the audio output terminal of the connected computer and prepare a
proper cable for connection. Some computers don’t have the audio output terminal.
• Speaker output is mono.
• When the audio cable is connected to the AUDIO OUT terminal, the speaker output is muted.
For Macintosh
• If your Macintosh has no video port, a monitor output adapter is required. Contact your dealer for further information.
• Some Macintoshes require a MAC adapter for the RGB cable for connection with this projector. Contact your dealer for further information.
About DDC
The COMPUTER/COMPONENT VIDEO IN-1 terminal of this projector complies with the DDC 1/2B standard. When a computer supporting this
standard is connected to this terminal, the computer will automatically load the information from this projector and prepare for output of appropriate
images.
• After connecting a computer supporting this standard to this terminal, plug the power cord of the projector in the wall outlet first, and then boot up
the computer.
COMPUTER IN
RGB cable for PC
AUDIO
OUT
Audio cable (option)
MONITOR OUT
Necessary when outputting to both
a PC monitor and the projector.
PC audio cable (option)
AUDIO
IN
to PC audio output
Computer
to monitor port
RGB cable for PC (option)