


2
2
Hardware Installation
The installation of the Smartio CP-104UL board involves both hardware and software. Software
installation is discussed in the next chapter. In this chapter, we discuss hardware installation.
The no-switch-no-jumper Smartio CP-104UL board’s IRQ number and I/O addresses are assigned
automatically by the PCI BIOS. For this reason, the board MUST be plugged in before installing
the driver software.
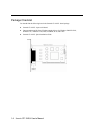
Installing the Smartio CP-104UL board
Step 1: Power off the PC.
Warning! To avoid damaging your system and board, make sure your PC’s power is switched off before
inserting this or any other board into an empy PCI slot.
Step 2: Remove the PC’s cover.
Step 3: Remove the slot cover bracket if one is in place.
Step 4: Insert the Smartio CP-104UL control board firmly into a free PCI or PCI-X slot.
Step 5: Fasten the holding screw to fix the control board in place.
Step 6: Replace the PC’s cover.
Step 7: Power on the PC; the BIOS will automatically set the IRQ and I/O address.
Note! Moxa Universal PCI or PCI occupy one unique IRQ and I/O addresses are assigned
automatically by the PCI BIOS.
Step 8: Proceed with the software installation, as described in the next chapter, “Software
Installation”.