


Chapter 2 Installation and Configuration
© National Instruments Corporation 2-3 NI PXI-8183 User Manual
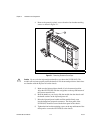
9. Check the installation.
10. Connect the keyboard and mouse to the appropriate connectors. If you
are using a PS/2 keyboard and a PS/2 mouse, use the Y-splitter adapter
(refer to Figure 4-1, Y-Splitter Cable) included with your controller to
connect both to the PS/2 connector.
11. Connect the VGA monitor video cable to the VGA connector.
12. Connect devices to ports as required by your system configuration.
13. Power on the chassis.
14. Verify that the controller boots. If the controller does not boot, refer to
the What if the NI PXI-8183 does not boot? section of Chapter 5,
Troubleshooting.
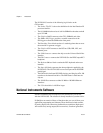
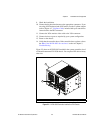
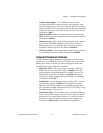
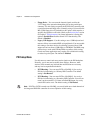
Figure 2-2 shows an NI PXI-8183 installed in the system controller slot of
a National Instruments PXI-1036 chassis. You can place PXI devices in any
other slot.
Figure 2-2. NI PXI-8183 Controller Installed in a PXI Chassis
1PXI-1036 Chassis 2 NI PXI-8183 Controller 3 Injector/Ejector Rail
1
2
3