


Chapter 1 Installing and Configuring the SCXI-119X
SCXI-1190/1191 User Manual 1-4 www.ni.com
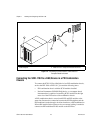
4. Insert the SCXI-119X module into slot 1. Gently guide the module into
the module guides and push it to the back of the slot until the
connectors make good contact. The module must be firmly engaged;
however, do not force the module into place. If the module is not
sliding easily into the chassis, check for correct insertion into the
module guides.
Note When installing the SCXI-119X module in an SCXI chassis, slot 1 should be filled
first, then fill slot 2 with the next SCXI-119X.
5. Insert any other SCXI modules into the remaining slots in the same
manner as described in step 4.
6. Secure all the SCXI-119X modules to the SCXI chassis by tightening
both module thumbscrews.
Connecting the SCXI-119
X
to a DAQ Device or Computer-Based
Instrument
You need the following items:
• SCXI chassis with the SCXI modules installed (Refer to the Installing
the SCXI-119X Module into an SCXI Chassis section.)
• SCXI cable assembly, which consists of a cable adapter and a cable
• An installed National Instruments DAQ device or computer-based
instrument that is able to control the SCXI chassis such as the NI 4060
• 1/4 in. flathead screwdriver
Consult your SCXI chassis documentation, other SCXI module
documentation, and DAQ device or computer-based instrument
documentation for additional instructions and warnings. Your SCXI-119X
module and any other SCXI modules should already be installed in the
chassis according to their installation instructions.
You must select one of the modules in the chassis to be the cabled
module—the module to which the SCXI cable assembly will be connected.
If the chassis contains at least one SCXI-1140 module, select an
SCXI-1140 as the cabled module; otherwise, select one of the remaining
modules.