


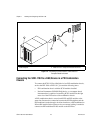


Chapter 1 Installing and Configuring the SCXI-119X
© National Instruments Corporation 1-9 SCXI-1190/1191 User Manual
Note If the Measurement & Automation Explorer recognized any module as an SCXI
custom module, you may be using an old version of NI-DAQ, the data acquisition driver
software. You can download the latest version of NI-DAQ for free at
www.ni.com.
Manually Adding Modules
If you did not auto-detect your SCXI modules, you must add each of your
modules separately. Use the following steps to manually add modules:
1. In the auto-detect window, select No under Auto-Detect Modules?
and click Finish.
2. Display the list of devices and interfaces by clicking the + next to
Devices and Interfaces.
3. The chassis you added is now displayed in the list. Display the list of
modules in the chassis by clicking the + next to the Chassis name.
4. Right-click on the appropriate physical installation slot and select
Insert.
Note When looking at the front of the SCXI chassis, slot 1 is the left most slot.
5. Select the module installed in that slot and click Next.
Note If the appropriate module name does not appear on the list, you may be using an old
version of NI-DAQ, the data acquisition driver software. You can download the latest
version of NI-DAQ for free at
www.ni.com.
6. Configure your module as follows:
• If the selected module is physically connected to a National
Instruments DAQ device or computer-based instrument, select
that device by using the Connected to control. If you want this
device to control the chassis, confirm that the checkbox labeled
This device will control the chassis is checked.
• If the selected module is not connected to a National Instruments
DAQ device or computer-based instrument, select none.
•In the Operating Mode box, select Multiplexed Mode.
7. Click Finish.
If you need to manually install more SCXI-119X modules in your chassis,
repeat steps 3 through 6 to configure each module.