


15
2. Projecting an Image (Basic Operation)
Connecting Your Computer/Connecting the Power Cord
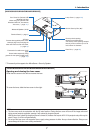
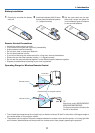
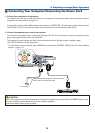
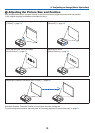
1. Connectyourcomputertotheprojector.
This section will show you a basic connection to a computer. For information about other connections, see “6.
Installation and Connections” on page 104.
Connect the computer cable (VGA) between the projector’s COMPUTER 1 IN connector and the computer’s port
(mini D-Sub 15 Pin). Turn two thumb screws of both connectors to fix the computer cable (VGA).
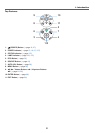
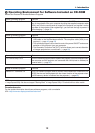
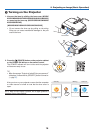
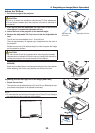
2. Connectthesuppliedpowercordtotheprojector.
First connect the supplied power cord’s three-pin plug to the AC IN of the projector, and then connect the other
plug of the supplied power cord in the wall outlet.
The projector’s power indicator will flash for a few seconds and then will light orange* (standby mode).
The STATUS indicator will also light green*.
* This will apply for both indicators when [NORMAL] is selected for [STANDBY MODE]. See the Power Indicator
section.(→ page 127)
COMPUTER 1 IN
Makesurethattheprongsarefullyinsertedinto
both the AC IN and the wall outlet.
To wall outlet ←
CAUTION:
PartsoftheprojectormaybecometemporarilyheatediftheprojectoristurnedoffwiththePOWERbuttonorifthe
ACpowersupplyisdisconnectedduringnormalprojectoroperation.
Usecautionwhenpickinguptheprojector.