


2-29
v1.0, September 2007
Chapter 2
Installation
This chapter describes the installation procedures for your NETGEAR Smart Switch. Switch
installation involves the following steps:
“Preparing the Site”
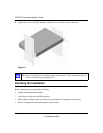
“Installing the Switch”
“Checking the Installation”
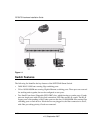
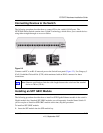
“Connecting Devices to the Switch”
“Installing an SFP GBIC Module”
“Installing Device as Stand-alone or Stack Master”
“Applying AC Power”
“Managing the Switch using a Web Browser or the PC Utility for Initial Configuration”
Preparing the Site
Before installing the switch, ensure the operating environment meets the requirements in the
following table.
Table 2-1. Site Requirements
Characteristics Requirements
Mounting • Desktop installations - Provide a flat table or shelf surface.
• Rack-mount installations - Use a 19-inch (48.3-centimeter) EIA standard equipment
rack that is grounded and physically secure. The rack-mount kit supplied with the switch
is also required.
Access Locate the switch in a position that allows access to the front panel RJ-45 ports, the ability
to view the front panel LEDs, and easy safe access access to the power connector.