


Easy Setup 6-1
CC
CC
hh
hh
aa
aa
pp
pp
tt
tt
ee
ee
rr
rr
66
66
EE
EE
aa
aa
ss
ss
yy
yy
SS
SS
ee
ee
tt
tt
uu
uu
pp
pp
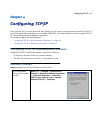
This chapter describes how to use the Easy Setup Console screens on your Netopia 3366C-ENT. After
completing the Easy Setup Console screens, your router will be ready to connect to the Internet or another
remote site.
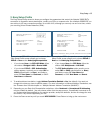
Easy Setup Console Screens
Using four Easy Setup Console screens, you can:
• Modify a connection profile for your router for the connection to your ISP or remote location
• Set up IP addresses and IP address serving
• Password–protect configuration access to your Netopia 3366C-ENT
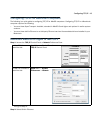
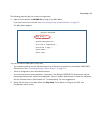
Accessing the Easy Setup Console screens
To access the Console screens, Telnet to the Netopia Router over your Ethernet network or run your terminal
emulator application. See “Connecting through a Telnet Session” on page 5-2 or “Connecting a console cable
to your router” on page 5-3.
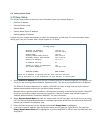
Note: Before continuing, make sure you have the information that your ISP or network administrator has given
you for configuring the Netopia Router.
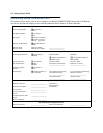
The Netopia Router’s first Console screen, Main Menu, appears in the terminal window of the attached PC or
Macintosh computer when:
• The Netopia Router is turned on
• The computer is connected to the Netopia Router
• Telnet software is running and configured correctly