


13
STATIC CONFIGURATION (OPTIONAL)
If you are manually configuring for a fixed or static IP address, perform the following:
1. Go to Start Menu/Settings/Control Panels and double click the Network icon. From the Network components list, select the
Configuration tab.
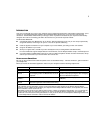
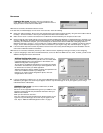
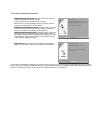
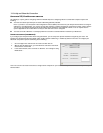
2. Select TCP/IP-->Your Network Card. Then select Properties. In the TCP/IP Properties screen (shown below), select the IP Address
tab. Click “Specify an IP Address.”
Enter the following:
IP Address: 192.168.1.2
Subnet Mask: 255.255.255.0
This address is an example of one that can be used to configure the router with the Easy option in the SmartStart Wizard. Your ISP or
network administrator may ask you to use a different IP address and subnet mask.
4. Click OK in this window, and the next window. When prompted, reboot the computer.
Note: You can also use these instructions to configure other computers on your network with manual or static IP addresses. Be sure each
computer on your network has its own IP address.
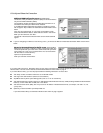
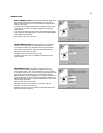
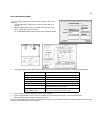
Click on the DNS Configuration tab. Click Enable DNS. Enter the following
information:
Host: Type the name you
want to give to this
computer.
Domain: Type your domain
name. If you don't have a
domain name, type your
ISP's domain name; for
example, netopia.com.
DNS Server Search
Order: Type the primary
DNS IP address given to
you by your ISP. Click Add.
Repeat this process for the
secondary DNS.
Domain Suffix Search
Order: Enter the same
domain name you entered
above.
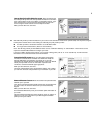
3. Click on the Gateway tab (shown below). Under
“New gateway,” enter 192.168.1.1. Click Add. This
is the Netopia R-series Router’s pre-assigned IP
address.