


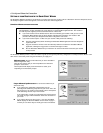


7
E
ASY
OPTION
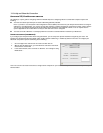
When the test succeeds, SmartStart indicates success.
If the test fails, the wizard displays an error screen. If the test fails, check the following:
Ⅲ
Check your cable connections. Be sure you have connected the router and the computer properly, using the correct cables. Refer to
the Step 1 “Connect the Router” sheet in your Netopia R-series Router documentation folio.
Ⅲ
Make sure the router is turned on and that there is an Ethernet connection between your computer and the router.
Ⅲ
Check the TCP/IP control panel settings to be sure that automatic IP Addressing (Windows) or DHCP (Macintosh) is selected. If you
are using a Windows PC, SmartStart will automatically detect a static IP address and offer to configure the computer for automatic
addressing. On a Macintosh computer, you must manually set the TCP/IP Control Panel to DHCP. See “Configuring TCP/IP on
Macintosh computers” on page 14. If you currently use a static IP address outside the 192.168.1.x network, and want to continue
using it, use the Advanced option to assign the router an IP address in your target IP range. See “Advanced option” on page 11.
Ⅲ
If all of the above steps fail to resolve the problem, reset the router to its factory default settings and rerun SmartStart. See the
on-line
User’s Reference Guide
for instructions.
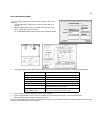
When the test is successful, SmartStart presents you with a different screen, depending on the type of router you are configuring.
Ⅲ
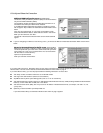
If you are configuring a router with an unswitched interface, such as an
Ethernet WAN interface, IDSL, or SDSL
, you will see the
Additional Configuration screen shown below.
Ⅲ
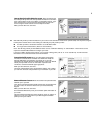
If you are configuring an
ISDN router
, you may see the ISDN Switch Type screen shown below, displaying the possible switch types
available for your region. This screen may not appear, if there is only one switch type in use in your region or you are using a
customized version of SmartStart.
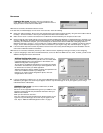
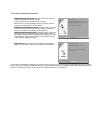
Connection Test screen. SmartStart tests the connection to the
router. While it is testing the connection, a progress indicator screen is
displayed and the router’s Ethernet LEDs flash.
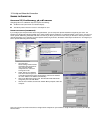
Additional Configuration screen. If you have a router that has a
permanent unswitched connection to your ISP, such as an IDSL, SDSL,
or Ethernet WAN interface router attached to a cable modem, the
Additional Configuration screen appears.
You may want to do additional configuration to customize your network
environment. SmartStart lets you launch your Telnet application. Click
the Telnet button to launch your Telnet application.
Advanced configuration options available via Telnet are explained in the
on-line
User’s Reference Guide
on your Netopia CD.
However, if you need no further configuration options, click Quit.
Congratulations! You’re done!
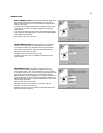
ISDN Switch Type screen. If you have an ISDN router, the ISDN
Switch Type screen appears.
Select one of the supported ISDN switch types for your ISDN line. Your
telephone company should have provided this information when your
ISDN line was installed.
When you have done this, click Next.
Note: The switch types listed are different for different regions. If your
region has only one switch type, this screen may not appear. In that
case, skip to “Additional ISDN Configuration screen” on page 8.