


Firmware Upgrade Instructions for the BayStack 100-series Hubs
4 893-00945-A
To access the PROM on the 100-series hub motherboard, follow these steps:
1. Disconnect the power cord(s) from the hub.
2. Label and disconnect any cables attached to the hub.
3. If the hub is installed in a stack, remove the hub from the stack.
Hubs can be placed on a shelf or a table, mounted on a wall, or located in
an equipment rack. Refer to the appropriate procedure in
Using the
BayStack 100-series Hubs
for instructions on how to remove a hub from a
stack.
4. If the hub is installed in a rack or on a wall, remove the
rack-mounting brackets from each side of the hub.
Use a #1 Phillips screwdriver to remove the flat-head screws that secure
the rack-mounting brackets to the hub. Set the screws and rack-mounting
brackets aside.
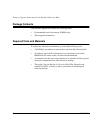
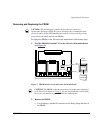
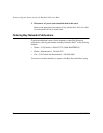
5. Remove the cover from the hub to access the motherboard.
a. Use a #1 Phillips screwdriver to remove the pan-head screws that
secure the cover to the hub, and set the screws aside.
b. Grasp the edge of the cover at the rear of the hub and lift upward.
Remove the cover from the hub and set it aside (see F
igure 1).
Figure 1. Removing the cover of the 100-series hub
000026FA