


Upgrading the Firmware
893-00945-A 7
Verifying the Installation
After you have replaced the PROM, Bay Networks recommends applying
power to the hub to verify that it is operational before reinstalling the hub in the
network.
To verify the installation, follow these steps:
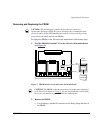
1. Connect the AC power cord to the hub, and check the Pwr and Stat
LEDs on the front panel of the hub.
The Pwr and Stat LEDs on the front panel of the hub should light green to
indicate that the hub is powered, has passed the power-up confidence test,
and is operating normally.
If the Pwr and Stat LEDs are green, continue to step 2.
If the Pwr and Stat LEDs are off, make sure the AC power source is
operational. If the AC power source is operational and the Pwr and Stat
LEDs are still off, check the AC power connection to the hub.
If the Stat LED is amber, the hub is experiencing a fault during normal
operation or during diagnostics. To troubleshoot the problem, follow these
steps until you locate the problem:
a. Reset the hub.
b. Check the Revision C firmware PROM to verify that the PROM is
installed correctly and none of the pins are bent.
c. Replace the Revision C firmware PROM with the old firmware PROM.
If the hub boots properly with the old PROM but not with the new
PROM, call your Bay Networks dealer for a new Revision C firmware
PROM chip.
d. Use a BayStack 100-series Network Management Module (NMM) to
verify the operation of the hub. Refer to
Using the BayStack 100-series
Network Management Module
(Bay Networks part number
893-841-A) for instructions on how to install and use an NMM to
verify the operation of the hub.
CAUTION:
Disconnect the AC power source before taking each step, and
reconnect power to test the results before trying the next step.