


15
Nortel WLAN - Security Switch 2300 Series Quick Start Guide
Quick Start — Physical Installation
This section describes how to physically install a WSS. For more information about physical installation, see Nortel
WLAN—Security Switch 2300 Series Installation and Basic Configuration Guide.
Installing the Nortel WLAN Security Switch
Estimated timing: 10 minutes
A WSS can be installed on either a tabletop surface or in an equipment rack. Table 2 outlines which installation
methods are available for each WSS model.
When choosing a location for the WSS, ensure that:
• The power outlet is within 1.82 m (6 ft) of the device.
• There is proper heat dissipation from and adequate ventilation around the
switch.
Tabletop Installation
Step Action
1 Ensure that the table surface supports at least 3 kg (6.6 lb).
2 Carefully turn the WSS upside down on a clean work surface with no debris.
3 Wipe the four placement locations for the rubber feet to clear away any oil or dust.
Each location area is marked with an ‘X’.
4 Attach the four rubber adhesive feet over the ‘X’s.
5 Turn the WSS right-side up, and place the switch in position on the table.
End
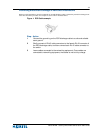
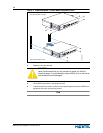
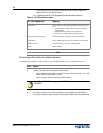
Equipment Rack Installation
Step Action
1 Remove the four bracket screws from each side of the WSS.
2 Align a bracket over the screw holes:
• For a front-mount equipment rack, align the bracket so that the bracket flange is
flush with the WSS front panel and away from the switch.
• For a center-mount equipment rack, align the bracket so that the bracket flange
is located near the center screw holes, as shown in Figure 2.
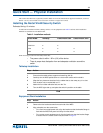
Table 2: Installation methods
WSS model Tabletop Front-mount rack Center-mount rack
2350 X
2360/2361 X X
2380 X X X
2382 X X X