


32
NN47250-300 (320655-E Version 02.01)
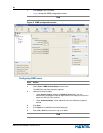
5 Click Next.
The Verification Progress dialog box appears.
6 Click Finish.
The WSS is now imported into WMS under the selected plan name. This
finishes the initial configuration of WMS.
End
Creating a Service Profile
With the base setup in place, you are now ready to start provisioning. Complete the following steps to create a Service
Profile for the wireless network:
Step Action
1 Select WSS_model > Wireless > Wireless Services from the navigation tree.
2 Click Create > Custom Service Profile from the smart menu.
The Service Profile Identifier screen appears.
3 Specify values for the Service Profile Identifier fields, as described in Table 8.
4 Click Next.
The Access Types screen appears.
5 Select Open Access from the list of access types.
6 Click Next.
The Open Access VLAN screen appears.
7 Select default from the list of VLANs.
8 Click Finish to complete the Service Profile.
End
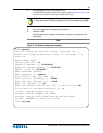
Note: SNMP is not enabled by default, and the Enable password has not
been set in the WSS. Ignore the errors these settings generate during the
verification process for now.
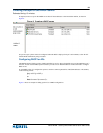
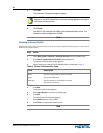
Table 8: Service Profile Identifier fields
Field Description
Name Specifies a unique name for the Service Profile.
SSID Specifies the SSID name.
SSID Type Specifies whether or not the SSID is encrypted.
Select Clear from the list.