


31
Nortel WLAN - Security Switch 2300 Series Quick Start Guide
Configuring WSS using WMS
Estimated timing: 15 minutes
With WMS installed and configured, it is time to finish the required WSS configuration.
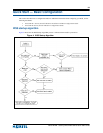
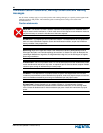
Creating a new network plan
Begin by creating a new network plan using the following steps:
Step Action
1 Double-click the WMS icon on your desktop to open WMS.
The WMS Services Connection dialog box appears, requesting a username
and password.
2 Log into WMS as before, with the following exceptions:
• Specify the username and password for the Administrator user.
• Check to ensure that Open Network Plan is not selected.
3 Select File > New Network Plan from the menu.
The Create Network Plan dialog box appears.
4 Specify a unique Network Plan Name and the correct Country Code.
5 Click Next.
A progress window appears as the new network plan is created and saved.
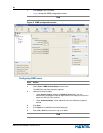
The new network plan is then displayed in WMS.
End
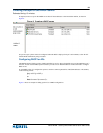
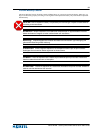
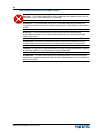
Uploading the WSS configuration
The WSS configuration that was completed using the quickstart wizard must be uploaded to the network plan using
the following steps:
Step Action
1 Select the Network Plan icon from the navigation tree.
2 Click Other > Upload WSS from the smart menu on the right side.
The Upload Nortel Wireless Security Switch dialog box appears.
3 Specify the WSS IP address.
4 Click Next.
If you did not choose to always accept self-signed certificates earlier, the
Certificate Check dialog box will appear. Accept the certificate to continue.
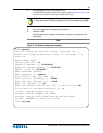
The Upload WSS Progress dialog box appears.
Note: The Enable password is not set. Leave this field blank when
uploading the WSS configuration.