


User Manual and Technical Guide The O'Neil microFlash Series of Printers Quick Demo • 19
Quick Demo
This chapter gives you quick setup instructions to get your microFlash
series of printers up and running. The demo program provided allows
your PC or hand-held computer to simulate a typical interchange between
a hand-held computer and a receipt printer out in the field.
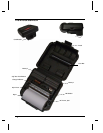
Wake Up
The self test button allows you to manually wake up the microFlash from
its sleep mode and to print self tests. To wake up the printer, press the red
self test button. After a moment or two, (if your beeper is turned on) you
will hear a beep. Your printer is now awake.
Self Test
To print a self test, press and hold the red self test button for four
seconds. The microFlash will print a self test.
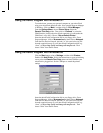
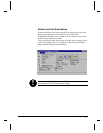
Using the Demo with DOS
To run the demo, connect your personal computer to the microFlash
using your microFlash download cable. Insert the microFlash
Configuration disk in the “A” drive. Type “CD\sample” to change to the
sample directory. Type “DIR” to see a list of files in the sample
directory. Now use the DOS “type” command as in this example:
Type filename > com1
Note: “filename” is the name of the file and Com1 is the COM Port the
microFlash is connected to.
Note: When printing from DOS, you may need to get your PC ready first
using the MODE command. Example: The microFlash is connected to
COM 1 and the PC is set at 9600 baud, no parity, 8 data bits, 1 stop bit.
From the “C” prompt, type:
mode com1:9600,n,8,1
2