


20 • Quick Demo User Manual and Technical Guide The O'Neil microFlash Series of Printers
Using the Demo Program with Windows 3.1
To run the demo, connect your personal computer to your microFlash
using your microFlash download cable. Now open the Program Manager
in Windows. Click on “
Main
” and then click on “
Print Manager
.”
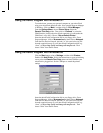
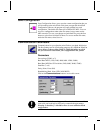
From the
Options Menu,
choose
Printer Setup
. Select the
Generic/Text Only
printer. Then click on “
Connect
” to select the
COM Port that you have the microFlash connected to (confirm that the
COM Port is set to N81). Choose “
Set as Default Printer
.”
Insert the microFlash Configuration disk in your floppy drive. From
Program Manager, click on
Accessories
and then click on
Notepad.
From the File menu in Notepad, open the “A” drive and select any file
from the sample directory on your microFlash Configuration disk (e.g.
“fonts”). Choose Page SetUp and change all margins to 0. Then
choose “Print” from the file menu.
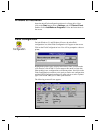
Using the Demo Program with Windows 95
Click the
Start
button, point to
Settings
, and then click
Printers
.
Double click
Add Printer
. Follow the instructions on your screen being
sure to select the
Generic/Text Only
printer and the COM Port your
microFlash is plugged into. Set the COM port to match the printers
settings
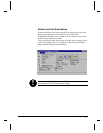
Insert the microFlash Configuration disk in your floppy drive. From
Program Manager, click on
Accessories
and then click on
Notepad.
From the File menu in Notepad, open the “A” drive and select any file
from the sample directory on your microFlash Configuration disk (e.g.
“fonts”). Choose Page SetUp and change all margins to 0. Then
choose “Print” from the file menu.