


1892 1335 - Orion Radio Modem Operating Instructions - v1.3 / Aug 2006 13
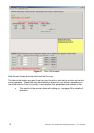
COM Ports and General Status
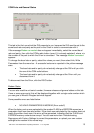
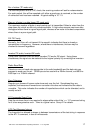
Figure 12 - COM Port tab
This tab is the first one which the GUI presents to you, because the GUI must be set to the
same baud rate and parity as the port on the Orion in order to communicate with it.
If the message Modem connected does not appear immediately, select the correct baud
rate and parity, then click the COMn radio button (even if it is already selected), where n is
the number of the port to which the Orion is connected. The message Modem connected
appears.
To change the baud rate or parity, select the values you want, then select Link, Write
Parameters from the menu bar. A successful outcome is reported in the yellow message
area.
v The baud rate and/or parity do not actually change at the GUI until you click
the one of the COM radio buttons.
v The baud rate and/or parity do not actually change at the Orion until you
disconnect from it.
To disconnect from the Orion, click the DISC button.
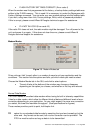
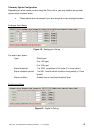
Modem Status
You can also read the unit serial number, firmware release and general status on this tab.
If one or more errors exist, this will be displayed together with a single code number which
you can give to Wood & Douglas technical support.
Some possible errors are listed below.
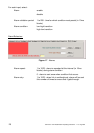
v NO VALID PARAMETERS IN MODEM! (Error code 2)
When the factory set-up was uploaded to the modem FLASH and EEPROM memories, a
parameter check sum was also written. If the check sum calculated by the modem does not
match the written check sum, this error will be generated, indicating that the FLASH and
EEPROM memory contents are corrupt. You can use menu item Troubleshooting,
Reprogram with Factory Settings to correct the parameters, or upload your own custom
settings to the modem in the normal way.