


39
Operating
Instructions
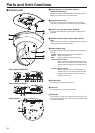
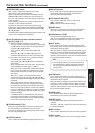
Parts and their functions
(continued)
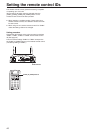
9 PRESET/LIMIT button
This is used to register the settings in the preset
memories or set or release the limiters.
When a preset memory call button is pressed while the
PRESET/LIMIT button is held down, the information on
the unit’s current direction and other settings is registered
in the call button.
Preset memory call buttons [1] to [12] correspond to the
unit’s No.1 to No.12 preset memories.
Furthermore, the pan and tilt movement range limits
(limiters) are set and released by operating the PRESET/
LIMIT button, MENU button and the pan/tilt buttons ([],
[], [] and []).
For details, refer to “Setting/releasing the limiters” (pages 102
to 103 in the <Operations and Settings>).
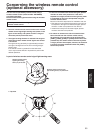
Pan-tilt buttons and menu operation buttons
[] [] [] [] []
(1) These are used to change the unit’s direction.
The unit is tilted in the up/down direction using the []
and [] buttons and panned in the left/right direction
using the [] and [] buttons.
The [] button does not work during tilting and
panning.
When the [] or [] and [] or [] buttons are
pressed at the same time, the unit moves diagonally.
(2) The buttons are used for menu operations when the
unit displays the camera menus.
Use the [], [], [] and [] buttons to select the
menu items.
When a selected item has a sub-menu, the sub-menu
will be displayed by pressing the [] button.
When the cursor is aligned with a particular item and
the [] button is pressed on the setting menu at the
bottom hierarchical level, the setting of the selected
item blinks.
When the [] button is pressed after the setting
has been changed using the [], [], [] and []
buttons, the setting stops blinking, and the new setting
is entered.
With a regular menu, the new setting is reflected
immediately after it has been changed if the change
was made from the setting in the blinking status, but
there are some menus (Scene, Format and Initialize)
where it is reflected only after the [] button has been
pressed, the blinking has stopped and the new setting
has been entered.
If the MENU button is pressed quickly (for less than
2 seconds) while the setting is in the blinking status,
the change will be canceled, and the setting selected
prior to the change will be restored.
FOCUS buttons [F] [N]
These are used to adjust the lens focus manually when
the manual setting is established for the lens focus.
The focus is adjusted in the far using the [F] button and in
the near using the [N] button.
A/FOCUS button
This is used when automatically adjusting the lens focus.
M/FOCUS button
This is used when manually adjusting the lens focus.
The FOCUS buttons ([F] and [N]) are used when
performing the actual adjustment.
OPT buttons [ON] [OFF]
This is used to select the normal or night mode.
[ON]: Night mode
[OFF]: Normal mode (standard setting)
HOME button
When this is pressed for 2 seconds, the unit’s direction
(panning or tilting) returns to the reference position.
ZOOM buttons [T] [W]
These are used to adjust the lens zoom.
The zoom is adjusted in the wide-angle using the [W]
button and in the telephoto using the [T] button.
FAST button
This is used to change the movement speed at which
the panning, tilting, zooming and focusing operations are
performed to the high speed.
When the button is tapped, the movement speed can be
set to the normal high-speed operation. When the button
is held down, it can be set to an even faster high-speed
operation. Tap the button to return the movement speed to
the normal high-speed operation.
p The operating speed for panning and tilting when
the preset memory settings have been called can
be changed using the Preset Speed item of the
camera menu.
Note
SLOW button
This is used to change the movement speed at which
the panning, tilting, zooming and focusing operations are
performed to the low speed.
When the button is tapped, the movement speed can be
set to the normal low-speed operation. When the button
is held down, it can be set to an even slower low-speed
operation. Tap the button to return the movement speed to
the normal low-speed operation.
A/IRIS button
This establishes the setting for adjusting the lens iris
automatically in line with the light quantity.
M/IRIS button
This establishes the setting for adjusting the lens iris
manually.
The IRIS + and IRIS – buttons are used when performing
the actual adjustment.
IRIS + button
This is used to adjust the lens iris in the opening direction.
IRIS – button
This is used to adjust the lens iris in the closing direction.