


About Your Projector
ENGLISH - 17
Preparation
About Your Projector
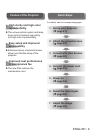
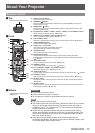
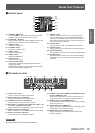
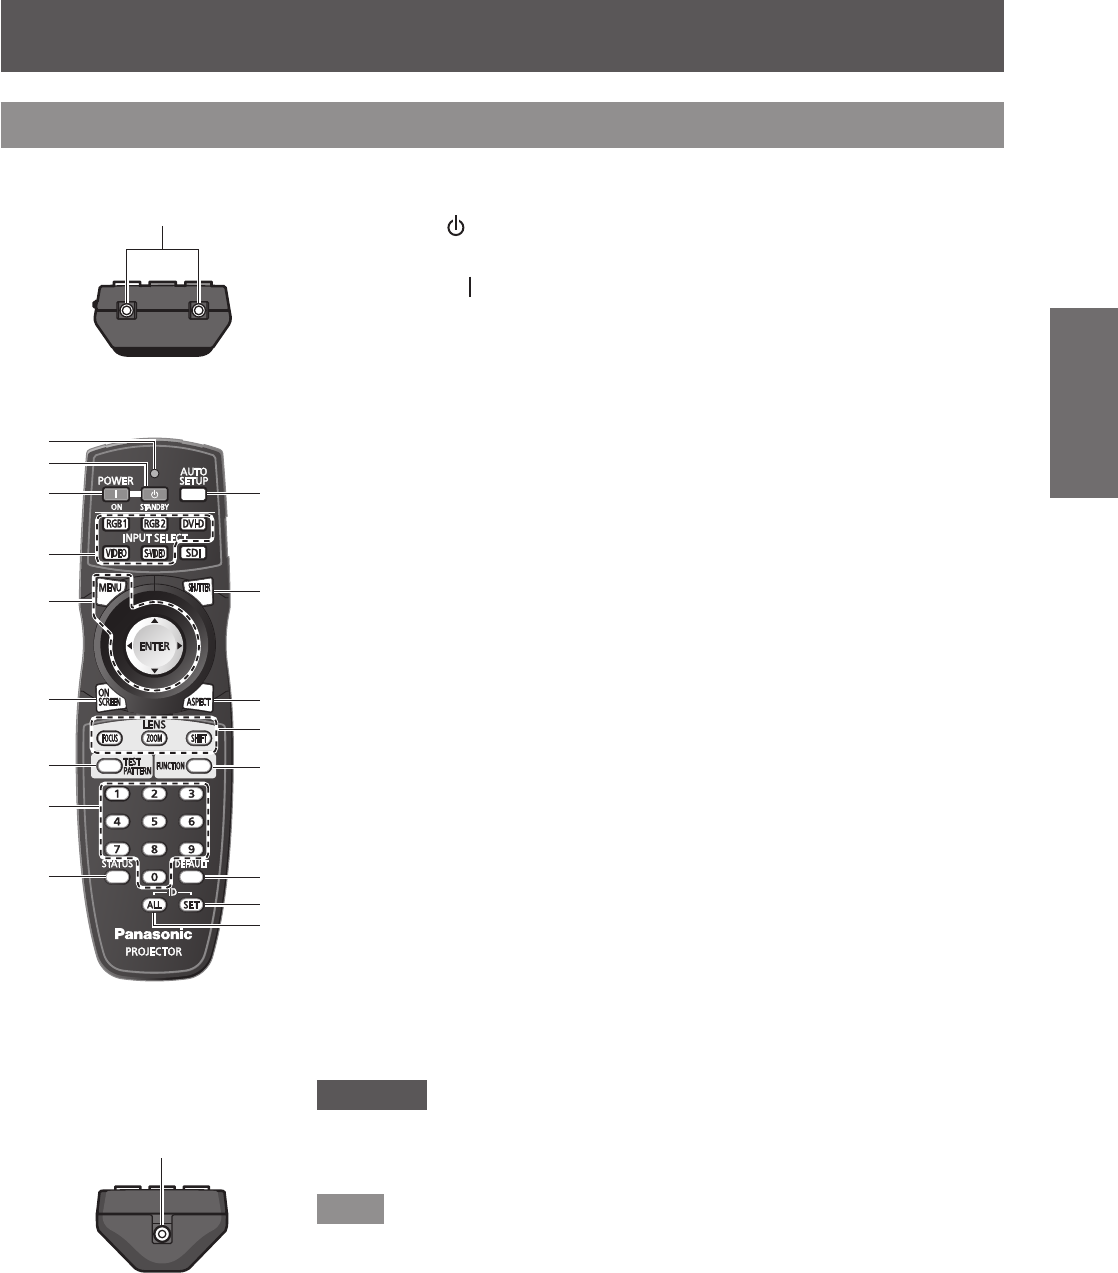
Remote control
■ Top
(1) Remote control indicator
Flashes by pressing any buttons.
(2)
STANDBY (
) button
Sets the projector to the standby mode when the <MAIN POWER> switch on the
projector is set to <ON>.
(3)
POWER ON (
) button
Starts projection when the <MAIN POWER> switch on the projector is set to <ON>
and in the standby mode.
(4)
Input Selection (<RGB1>, <RGB2>, <DVI-D>, <VIDEO>, and <S-VIDEO>) buttons
Switches the input signal to project. (
page 38)
(5) <MENU> button/<ENTER> button/ ▲▼◀▶ buttons
Use it to operate the menu screen. (
page 41)
(6) <ON SCREEN> button
Switches on (display)/off (not display) the on-screen display function. (
page 38)
(7) <TEST PATTERN> button
Displays the test pattern. (
page 39)
(8) Number (<0> - <9>) buttons
Use it when the system uses multiple projectors.
Used to input the ID numbers or passwords.
(9) <STATUS> button
Displays the information of the projector.
(10) <AUTO SETUP> button
Automatically adjusts the image display position while projecting the image.
[PROGRESS] is displayed o
n the screen while the image is adjusted automatically.
(
page 39)
(11) <SHUTTER> button
Use it to temporarily turn off the image. (
page 38)
(12) <ASPECT> button
Switches the aspect ratio of the image. (
page 40)
(13) Lens (<FOCUS>, <ZOOM>, and <SHIFT>) buttons
Adjusts the projection lens. (
pages 34, 36)
(14) <FUNCTION> button
You can assign a frequently used operation and use as a shortcut button. (
page 39)
(15) <DEFAULT> button
Restores the contents of the sub-menu to the factory default setting. (
page 41)
(16) <ID SET> button
Sets the ID number of the remote control when the system uses multiple projectors.
(
page 20)
(17) <ID ALL> button
Simultaneously controls all the projectors with one remote control when the system
uses multiple projectors. (
page 20)
Attention
z
Do not drop the remote control.
z
Av
oid contact with liquids or moisture.
z
Do not attempt to modify or disassemble the remote control.
Note
z
The <SDI> button cannot be used.
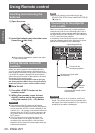
z
The remote control can be used within a distance of about 30 m if pointed
directly at the remote control receiver. The remote control can control
at angles of up to
±
15
°
vertically and
±
30
°
horizontally, but the effective
control range may be reduced.
z
If there are any obstacles between the remote control and the remote
c
ontrol signal receptor, the remote control may not operate properly. The
signal will be reected off the screen, but the operating range may differ
due to the screen material.
z
If the remote control signal receptor receives strong light such as
uorescent light directly, the remote control may not operate properly. Use
it in a place distant from the light source.
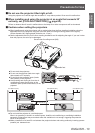
Remote control signal emitters
■ Front
(1)
(2)
(3)
(4)
(5)
(6)
(7)
(8)
(9)
(10)
(11)
(12)
(13)
(14)
(15)
(16)
(17)
■ Bottom
Remote control wired terminal
(
page 20)