


Powering ON/OFF
34 - ENGLISH
Basic Operation
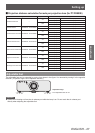
Powering up the projector
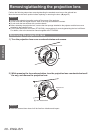
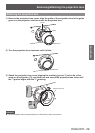
When using the optional projection lens, attach the
projection lens before turning on the power. (
page 29)
Remove the lens cover beforehand.
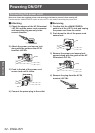
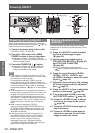
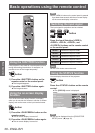
1) Connect the power plug to the outlet.
(AC 220 V - 240 V 50 Hz/60 Hz)
2) Press the <ON> side of the <MAIN
POWER> switch to turn on the power.
z
The power indicator <STANDBY (RED)/ON
(GREEN)> will light in red, and the projector will
enter the standby mode.
3) Press the POWER ON < > button.
z
The power indicator <STANDBY (RED)/ON
(GREEN)> will light in green and soon the
image is projected on the screen.
Note
z
If the projector is turned on at about 0
°
C (32
°
F), a
warm-up period of approximately ve minutes may
be necessary to start projection.
The temperature indicator <TEMP> lights up
during the warm-up period. When the warm-up is
completed, the temperature indicator <TEMP> turns
off and the projection starts. Refer to
“
Managing
the indicated problems
”
(
page 87) for the indicator
status.
z
If the temperature of the operating environment is
low and warm-up takes more than ve minutes, the
projector will judge that a problem has occurred
and the power is automatically set to stand-by. If
this happens, increase the temperature around the
projector so that it is 0
°
C (32
°
F) or higher and turn
off the main power, and then turn on the power
again.
z
When turning on the power, if [ECO] is
selected in the [PROJECTOR SETUP] menu
[STANDBY MODE] (
page 63), projection will
start approximately ten seconds later than when
[NORMAL] is selected.
z
If the direct power off function was used to set
the <MAIN POWER> switch to <OFF> during
projection, the next time the <MAIN POWER>
switch is set to <ON> with the power plug
connected to the outlet, The power indicator
<STANDBY (RED)/ON (GREEN)> will soon light
green and an image will be projected.
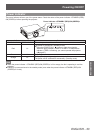
Making adjustment and
selection
It is recommended that the images are projected
continuously for at least 30 minutes before the focus
is adjusted.
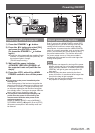
4) Press the <FOCUS> button to adjust
the focus of the image roughly.
(
page 36)
5) Set the projection method using
[PROJECTION METHOD] (
page 61)
and [COOLING CONDITION]
(
page 62).
z
Refer to
“
Navigating through the menu
”
(
page 41) regarding the operation of the menu
screen.
6) Press the Input Selection (<RGB1>,
<RGB2>, <DVI-D>, <VIDEO>, and
<S-VIDEO>) buttons to select the input
signal. (
page 38)
7) Adjust the front and back, and sideway
tilt of the projector with the adjustable
feet. (
page 27)
8) Press the <SHIFT> button to adjust the
position of the image. (
page 36)
9) If the input signal is RGB, press the
<AUTO SETUP> button. (
page 39)
10) Press the <ZOOM> button to adjust
the size of the image to the screen.
(
page 36)
11) Press the <FOCUS> button again to
adjust the focus.
12) Press the <ZOOM> button again to
adjust the zoom and the size of the
image to match the screen.
1) 7) 6 ) 9 )
3)
3)
5)
5)
4)
9)
6)
8)
10), 12)
4), 11)
8), 10), 11), 12)
2)