


6212-A2 and 6382-A1 ADSL Router User’s Guide
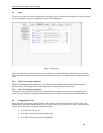
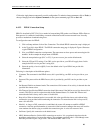
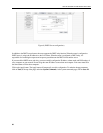
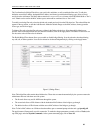
4.4.4 Modem setup
To configure the DSL modulation type:
Go to the Home screen and Click on Setup. Under WAN Setup, select Modem Setup. This will bring up the
modem setup screen. Leave the default value if you are unsure or the DSL/ISP did not provide this information.
For most all cases, this screen should not be modified.
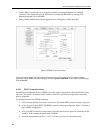
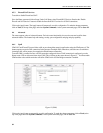
Click on the Apply button. The Apply button will temporarily save this configuration. To make the change permanent,
click on Tools (at the top of the page) and select System Commands. At the system commands page, click on Save
All.
4.5 Configuring the LAN
By default, your router has DHCP server (LAN side) enabled. If you already have a DHCP server running on your
network, you must disable one of the two DHCP servers. If you add a second DHCP server to the network, you
will experience network errors and the network will not function normally.
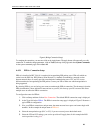
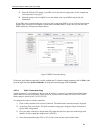
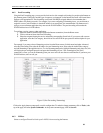
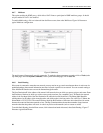
4.5.1 Enable/Disable DHCP
To enable or disable DHCP:
Go to the Home screen and Click on Setup. Under LAN Setup, select DHCP Configuration. This will bring up
the screen shown in Figure 10.
The Start IP Address is where the DHCP server starts issuing IP addresses. This value must be greater than the
router’s IP address value. For example, if the router’s IP address is 192.168.1.1 (default) than the starting IP
address must be 192.168.1. 2 or higher.
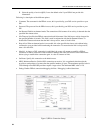
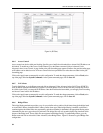
The End IP Address is where the DHCP server stops issuing IP addresses. The ending address cannot exceed a
subnet limit of 254. Hence the maximum value for the default router is 192.168.1.254. If the DHCP server runs
out of DHCP addresses, users will not get access to network resources. If this happens you can increase the
Ending IP address (to the limit of 255) or reduce the lease time.
The Lease Time is the amount of time a network user is allowed connection to the Router with their current dynamic IP
address. The amount of time is in units of minutes; the default value is 3600 minutes (60 hours).
Note: If you change the start or end values, make sure the values are still within the same subnet as the router’s IP
address. For example, if the router’s IP address is 192.168.1.1 (default) and you change the DHCP start and end
IP addresses to be 192.128.1.2 and 192.128.1.100, you will not be able to communicate with the router if your PC
has DHCP enabled.
29