40
OEM6250 Installation Guide
d. Use the TFB command again to observe the feedback
device’s position. The value should have increased
from the value observed in Step 7.b.
If the position reading decreases when using a positive
SOFFS setting, turn off the OEM6250 and the drive
and swap the CMD+ and CMD- connections either at the
OEM6250 or at the drive, whichever is more accessible
(this will not work for servo drives that do not accept
differential input). Then turn on the OEM6250 again,
enter the DRIVE11 command, and repeat Steps 4
through 7.d. before proceeding to Step 8.
e. Enter the SOFFS¯ command to stop the motor, and
enter the DRIVE11 command to re-enable the drives.
Step 8
Having set the servo output offset to zero with the
SOFFS¯ command (see Step 7.e.), read the OEM6250’s
analog output with the DVM to determine if there is any
offset caused by the electrical interconnections between the
OEM6250 and the drive.
If the DVM reads anything other than zero, enter the
DVM’s reading (but with the opposite polarity) as the
offset adjustment with the SOFFS command. For
example, if the DVM reading is 0.015V, then enter
SOFFS-¯.¯15. If, after doing this, the reading is still
not zero, then fine-tune it by trying SOFFS entries of
slightly different values until the DVM reading is between
±3.0mV.
Step 9
If you are using a velocity drive, motion may still be
occurring due to the drive’s balance/offset setting. If so,
adjust the drive’s balance/offset until motion stops.
Consult the drive’s user documentation for instructions.
Step 10
Proceed to the Drive Tuning Procedure section to tune the
velocity drive (if you are using a torque drive, skip to the
Controller Tuning Procedure).
Drive Tuning Procedure
(Velocity Motor Drives Only)
The goals of the Drive Tuning Procedure are to:
1. Tune the drive to output the desired velocity at a given
voltage from the OEM6250.
2. Tune the drive (iteratively) to achieve the desired
response.
NOTE
Be sure to complete the
Tuning Setup Procedure
before
proceeding with the following drive tuning procedure.
Unlike the
Tuning Setup Procedure
, you must tune one
axis at a time.
Step 1
Tune the drive to output the desired velocity at
a given voltage from the OEM6250:
a. If your system has mechanical stops, manually move
the load to a position mid-way between them.
b. Enter the SOFFS command to set the OEM6250’s
output voltage to its maximum level, 10.0 volts
(SOFFS1¯ for axis 1, or SOFFS,1¯ for axis 2).
c. Adjust the drive gain factor (sometimes called the tach
gain) such that when the OEM6250’s command output
is 10V, the velocity just reaches its maximum value
(check the velocity with the TVELA command). Refer
to your drive’s user documentation if necessary.
EXAMPLE
Suppose your drive can run at a max. velocity of
7000 rpm (or 116.67 rps). If the drive gain factor is
20 rps/V, then the drive will reach the maximum
velocity (116.67 rps) when the OEM6250’s command
output is only 5.833V. This means the full range of
±10V is not fully usable. To use the full range of
±10V, the gain factor has to be adjusted to 11.667
rps/V.
Drive manufactures usually provide a potentiometer
for adjusting this gain factor. Some manufacturers
provide preset values selectable with jumpers or DIP
switches.
Step 2
Tune the drive (iteratively) to achieve the
desired response:
a. Enter the following commands to create and execute a
step velocity command:
DEF STEPS ; Begin program definition for STEPS
@SGP0 ; Set the SGP gain to zero
@SGI0 ; Set the SGI gain to zero
@SGV0 ; Set the SGV gain to zero
@SGAF0 ; Set the SGAF gain to zero
@SGVF0 ; Set the SGVF gain to zero
@SMPER0 ; Disable checking the maximum
; allowable position error
@SOFFS0.5 ; Set command output to 0.5 volts
T1 ; Wait for 1 second
@SOFFS0 ; Set command output to zero volts
; (stopping the motor)
@SMPER1 ; Re-enable checking the maximum
; allowable position error
END ; End definition of the program
STEPS ; Execute the program called STEPS
; (the motor will move for 1 second
; and then stop)
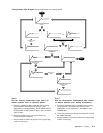
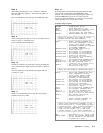
b. Observe the plot of the commanded velocity versus the
actual velocity on the oscilloscope.
Using the tuning methods specified in the drive’s user
documentation, tune the drive to achieve a first-order
response (no overshoot) as illustrated below—repeat
Steps 2.a. and 3.b. as necessary.


