


DSATX Manual Copyright 2006 Mpegbox.com Page 8 of 13
4. Serial Port Connectivity
4.1. Serial Port Adapters
The DSATX was developed to be used with the serial hardware interface standard developed in the
Robotics Industry by Acroname Inc. The DSATX is compatible with both the USB Serial Adapter and the
RS-232 Serial Adapter.
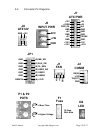
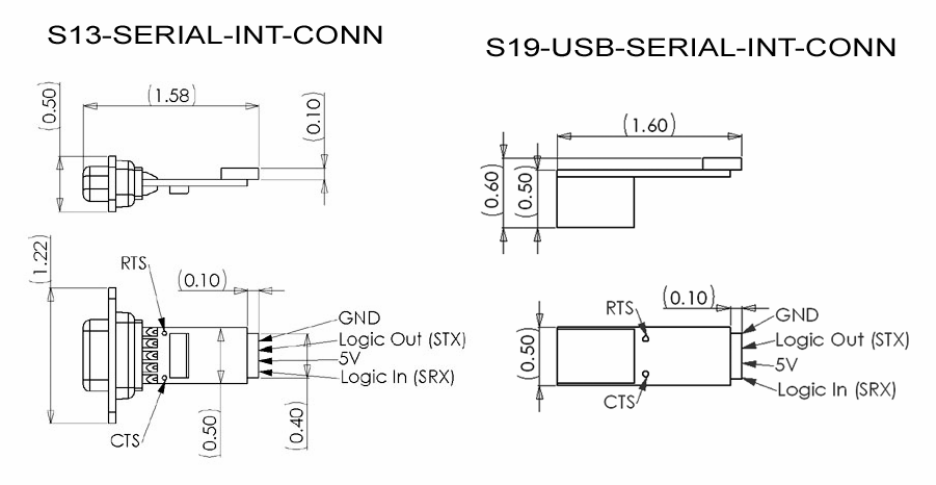
• RS-232 DB-9 Adapter - PN: S13-SERIAL-INT-CONN
• USB B-Type Adapter - PN: S19-USB-SERIAL-INT-CONN
4.2. Serial Port Overview
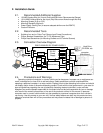
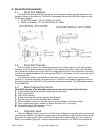
DSATX Location J2 has a 4-pin header that matches the connection diagram on the above adapter
drawings. The 5-Volt power comes from the DSATX and is always active even in sleep mode. Be careful
not to expose the serial port pins of the DSATX to voltages above 5 volts or short out the pins. Connecting
the Serial Port adapter backwards will not damage the DSATX or the adapter, but it will not function and is
not recommended.
The serial port is setup to use 9600 Baud, 8 Data bits, No parity, 1 Stop bit, and no flow control
(9600,8,N,1). Computer programs like HyperTerminal or TeraTerm are examples of applications that can
be used to interface with the DSATX’s Extended Basic and Advanced Modes. The USB adapter creates a
virtual COMM Port.
4.3. Basic Programming Control
The DSATX responds to the following commands over the serial interface (Case Sensitive):
E: Enable Writing Parameters (Allows the below commands to work)
P: Enter Program Mode
D: Load Factory Defaults
F: Enable the printing of the serial diagnostic feed (Feed On)
O: Stop the printing of the serial diagnostic feed (Feed Off)
Z: Set the shutdown counter to 2 seconds (causes a quick shutdown in Countdown Mode)
@: Force a power button press, shutdown or startup (for testing JP1 G1,2 polarity)
G: (Advanced Feature) Get Parameter or Query
S: (Advanced Feature) Set Parameter
4.4. Diagnostic Feed
When the Diagnostic Feed is turned On, the DSATX has a diagnostic output that comes over the serial
port output every 200ms. It includes the voltage of the input and outputs, the state of the controller, as well
as some of the control signals. This is enabled by first typing ‘E’ to enable writing, and ‘F’ to enable the
Feed. It is turned Off by typing ‘O’. These are case sensitive commands. The DSATX will remember the