


Your LCD
Monitor :
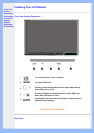
• Front View
Product
Description
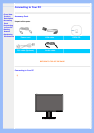
• Setting Up
and
Connecting
Your
Monitor
• Getting
Started
• Optimizing
Performance
Getting Started
Getting Started
Use the information file ( .inf) for Windows® 95/98/2000/Me/XP/Vista or later
The built-in VESA DDC2B feature in Philips Monitors supports Plug & Play requirements
for Windows® 95/98/2000/Me/XP/Vista. This information file ( .inf) should be installed in
order that your Philips monitor can be enabled from the 'Monitor' dialog box in Windows®
95/98/2000/Me/XP/Vista and the Plug & Play application can be activated. The installation
procedure based on Windows® '95 OEM Release 2 , 98 ,2000, Me, XP and Vista is specified
as follows.
For Windows® 95
1. Start Windows® '95
2. Click on the 'Start' button, point to 'Settings', and then click on 'Control Panel'.
3. Double click on the 'Display' Icon.
4. Select the 'Settings' tab then click on 'Advanced...'.
5. Select the 'Monitor' button, point to 'Change...' then click on 'Have Disk...'.
6. Click on the 'Browse...' button, select the appropriate drive F: ( CD-ROM Drive)
then click on the 'OK' button.
7. Click on the 'OK' button then select your monitor model and click on 'OK'.
8. Click on the 'Close' button.
For Windows® 98
1. Start Windows® 98
2. Click on the 'Start' button, point to 'Settings', and then click on 'Control Panel'.
3. Double click on the 'Display' Icon.
4. Select the 'Settings' tab then click on 'Advanced...'.
5. Select the 'Monitor' button, point to 'Change...' then click on 'Next'
6. Select 'Display a list of all the drivers in a specific location, so you can choose the
driver you want.' then click on 'Next' and then click on 'Have Disk...'.
7. Click on the 'Browse...' button, select the appropriate drive F: ( CD-ROM Drive)
then click on the 'OK' button.
8. Click on the 'OK' button then select your monitor model and click on the 'Next'
button.
9. Click on the 'Finish' button then the 'Close' button.
For Windows® 2000
1. Start Windows® 2000
2. Click on the 'Start' button, point to 'Settings', and then click on 'Control Panel'.
3. Double click on the 'Display' Icon.
4. Select the 'Settings' tab then click on 'Advanced...'.
5. Select 'Monitor'
- If the 'Properties' button is inactive, it means your monitor is properly configured.
Please stop installation.
- If the 'Properties' button is active. Click on 'Properties' button. Please follow the
steps given below.
6. Click on 'Driver' and then click on 'Update Driver...' then click on the 'Next' button.