


121
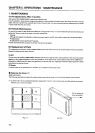
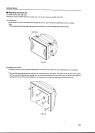
[2] Remove the panels at the top and right side of the screen unit to be replaced. (Remove 12 screws. )
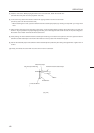
The panels are made of polycarbonate. Adhesive double coated tapes are pasted to the frames. When removing the
panels, do not pull the panels in directions which are difficult to pull, but pull straight as much as possible as shown in fig.
5-2 The panel will not deform in this way.
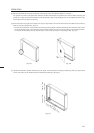
[3] Peel off the black vinyl tape at the edges. The top and right sides of the screen will become free. Remove the screen by
pulling in the top right direction. (fig. 5-3)
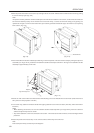
* The left side and bottom of the screen is fixed to the panel by adhesive double coated tape. The lenticular sheet can be
removed relatively easily. The fresnel lens is fixed firmly and will not come off by just pulling in the top right direction.
To remove, while pulling in the top right direction, remove it by opening it as if opening a door. (Fig. 5-4)
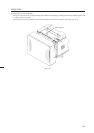
[4] Re-paste the adhesive double coated tape on the panel. It can be peeled off easily by scratching it with your finger back-
wards. Then paste a new adhesive double coated tape according to the figure.
(Fig. 5-3) (Fig. 5-4)
Approx. 5cm Approx. 5cm
Approx. 10cm Approx. 10cm
(Fig. 5-5)
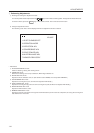
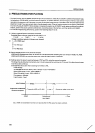
OPERATIONS