


37
2. INSTALLATION AND ASSEMBLY
(1) Confirmation
1 Decide the position for installing the system according to the installation conditions in Chapter 3.
Check Items
[1] Dimensions of installing position, space at the back, distance to the ceiling
[2] Floor flatness, strength, roughness
[3] Position of power supply
[4] Installing location
Necessity ti strengthen the floor, wall, etc.(reinforcement cover, sheet, plank, etc.), path used to transport the system,
width of passage, if elevator is available , its size and maximum bearing weight, etc.
[5] Position, specifications, and structure of a transmission equipment, and image type
[6] Model number of equipment used, and their quantity (perform according to list).
Check if there is enough equipment for each unit
*These procedures must be performed by only one person.
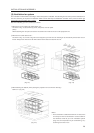
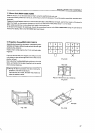
(2) Opening the Packaging
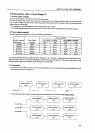
1 Packaging specifications
[1] Multi Projection Unit (RM-V2400N/V2500N) : 770(W) × 630(H) × 670(D) 43.5kg
[2] Projection Screen Kit (RMS-V4011) : 940(W) × 230(H) × 730(D) 15.7kg
(RMS-V5011) : 1126(W) × 230(H) × 879(D) 20.2kg
[3] Projection Frame (RMF-V4011) : 950(W) × 180(H) × 1300(D) 31.2kg
(RMF-V5011) : 1160(W) × 250(H) × 1475(D) 35.4kg
[4] Projection Cabinet (RMF-V4011R) : 1006(W) × 859(H) × 1454(D) 68.0kg
(RMF-V4011CR) : 1007(W) × 867(H) × 1393(D) 58.0kg
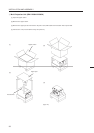
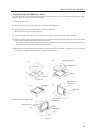
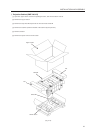
2 Opening the packaging
Open from the big ones first and put the small packagings inside the empty big packagings. Also dispose or store the
packagings.
Do not mix up the opened items with those still in the packaging.
Move the empty packagings somewhere else so that they will not come in the way. Next, obtain an assembly space that is as
wide as possible.
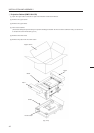
* Turn down the opened packagings upside down to differentiate them from those not opened.
Do not lose accessories, the warranty card, etc.
INSTALLATION AND ASSEMBLY